Sunday, August 30, 2015

The Hills are Alive


Listening to our favourite Sunday morning music show, Chicken Hotrod on 2RRR community radio, I was struck by the idea that there's a hundred different ways to sing a song and come up with good results.

Well folks, it's the same with growing potatoes. There's a hundred different ways to do it, and all of them can come up with good results. 

I was Googling "when to hill around potatoes" and I came up with (maybe not a hundred) but lots of different ideas. Some said to start doing it when plants are 6 inches high, others said to wait until when plants are 10 inches high, when plants are 12 inches high, even one daredevil advocating waiting until her plants were 16 inches high. 

As to "what" to use when hilling around your spuds, some said "just use compost", others said "just use straw", others said "mix up straw and compost". There were votes for "potting mix" and some for good old "garden soil".

I'll bet you that all these good folk advocate their methods because they worked for them. So, I think the big message to newbie spud growers is just to relax. No matter what you do will probably work just fine. So, here's what I did this morning.


Here's my bag of spuds with the plants about 6 inches high. So you can call me an "early hiller" if you like. "Why this thing called 'hilling'?". Excellent question. That's the one thing the spud growers of the world ALL seem to agree on. If you mound up soil around your growing potato plants you will get a bigger crop of spuds, and you will also get a bigger crop of spuds that are edible. If growing spuds are exposed to sunlight they will become green, inedible potatoes, so hilling serves to cover up the crops of spuds forming.  


 I've shared my excess spuds and extra spud bag with my good friend Jolanda, and she has a bag of compost which she will be using to hill around her spuds. I'm doing it slightly differently, mostly because I like the way it looks. Yes, it's that irrational, folks! I'm mixing up my own homemade compost with handfuls of straw in a roughly 50:50 mix.


The easy way to mix it up is in a bucket or trug. Compost is an excellent choice because it's a gentle fertiliser that helps to feed the potato plants. The straw is nice and light, so the drainage of water through the bag should be nice and free. Besides, I just love the look of straw ... it's so farmyard.


It's so simple. Just pile in your compost, or your straw/compost blend, leaving the topmost leaves of the plants exposed.


I've got a couple of little "later starter" shoots poking through, so I'll give them a few more days to grow taller and catch up with the others, then I'll finish my first hilling job next weekend by hilling around them. 

About a month from now, the plants should have grown even taller. Next time I'll unroll the sides of the bag so it is at full height, and I'll complete a second and last "hilling" around the plants. After that all I have to do is water the bags if Huey hasn't been kind enough to help out with some rain every couple of days.

Friday, August 28, 2015

Springing into action


Australians have never been all that flash at standing on formality, so the idea that spring begins on a certain date (such as September 1 Down Under) has never been taken at all seriously by gardeners. Spring began quietly a week or two ago, in fact – you can see it in the way things start growing and greening up after a period of winter slackness – but now it's getting into full swing.

Here, at our place, spring is well and truly underway when our dazzling orange Scadoxus light up the garden with their torches of vivid colour. But this year, we have a newcomer that blooms in a much more demure way at exactly the same time. It's a little groundcover native Grevillea 'Pink Lady', a modern hybrid variety, and for this "mostly photos" posting, I'll start with our newcomer, then move onto the razzle dazzler.

Grevillea 'Pink Lady', small toothbrush type blooms about
3-4cm (1.5 inches) long.

Though "pink" it's also mid green and pale lemony green too.

The fallen leaves from the overhead olive tree give you a
sense of how small these delicate grevillea flowers are.

Planted as a 20cm wide baby groundcover last spring, the
Grevillea now covers a bit over 1m across and is still growing
well, and so far is healthy and happy. Fingers crossed.

Meanwhile, further down the back of the garden, our most striking plants, our Scadoxus puniceus, are in bloom again. Every year I do a scadoxus posting ... they're just such an irresistibly photogenic flower. And this year one of the babies is having its first go at flowering.

Little skinny kid, second from the left, with a decided lean,
but for a first go at flowering, it's doing just fine.

The adults have come through several days of wet weather
slightly bedraggled but still radiant. In the background our
sprouted Scadoxus seeds in the pot are being shown how
its done by the grown-ups.

There's one view of the Scadoxus which is impossible to
capture in a photo, and that's the view from our house.
The deep green backdrop of the murraya hedge is no doubt
the perfect colour to show off the pale green of the
stems, the maroon of the outer petals and the outrageous
orange of the blooms themselves. That colour invariably
catches your eye, even from within the house more than
10 metres away. Its announces "spring" like no other plant.

Monday, August 24, 2015

Rain, the sound of plants growing


Gentle rain, the kindest rain of all. Soaking into the soil without damaging the tender seedlings, or even making the flowers sad. (Edit: well, that was how it was until last night's downpour!) We're into our second day of gentle rain now, after a record midwinter dry spell, and the garden definitely needs every drop it can get.

More usually, after a long dry spell we get pounding rain that brings damage and much needed relief in equal doses. (Edit: talk about speaking too soon ... the more usual pounding, damaging rain arrived last night.) I originally wished a special thankyou to Huey for this lovely, gentle, nurturing rain, but in this re-edited posting, it's "thanks Huey for the rain, but you can back off now".  

Anyway, it's good to have the rains arrive, so here's a quick lap of our garden, camera in hand.


Still bare, our frangipani is wearing strings of these watery jewels now.

Poppies never cope well with rain, but today they're just
drooping their heads a little. They'll look up when the sun
breaks out.

Rosemary in bloom with vivid green new growth, too.

A week away from full flowering, the scadoxus are already
glowing like beacons, and opening rapidly now there's rain.

Aeonium 'Schwartzkopf' looks like it's trying to resist getting wet. 

While in a dark, shady corner this Vriesia
bromeliad is putting on a colour party.

The foodies are loving it. Lettuce planted less than a week ago.

Potato babies growing noticeably every day.

Thai limes were fertilised on the weekend, and with this steady
watering they'll be flowering and fruiting through summer.
As I've mentioned before, I am so glad the roof over the rear part of our house is galvanised iron. There's nothing more pleasing to this gardener than enjoying breakfast, fresh mug of coffee to start the day, listening to the sound of rain on a tin roof.


Saturday, August 22, 2015

Woo hoo, rain coming, action stations!


We gardeners are right up there in the top echelon of people who get a real kick out of enjoying life's simple pleasures. This morning, I'm a kid again, excited by the forecast of showers maybe coming this afternoon, then a definite promise of rain tomorrow. Woo hoo, the first rain in ages! Lots of little jobs to do ...

But wait, there's more. My bag of potatoes is sprouting up a forest of little green men. It's about time, too. It's been three weeks since I bagged them up (you can read all about that little excercise here). 


Traaa daaa, Mr Potato Head makes his debut. I've planted
four seed potatoes in the bad and there are four sets of
buds coming up, so they're all performing nicely.
Now that the potato shoots are up, the other job to do is to
gently fold down the sides of the bag, so the little shoots can
get some more sunlight. They don't need any fertiliser. They
are surrounded by it all already, courtesy of the compost. 

With this rain coming, it's the perfect time to get the job of
feeding the citrus trees done. Our lemon tree is covered in
new shoots, flowers and flower buds, so it's busting for a
decent feed. The same applies to our lime tree and our potted
Thai (kaffir) lime. 

Here in Australia it's best to feed citrus twice
a year, at the end of summer (in late February)
and now, the end of winter or start of spring
(late August). So if you have citrus trees, do
it now. Here's my posting on how I do it from
last February, 'Flingin' in the rain'. Today
I am again using my old standby, Dynamic Lifter.
This is outrageous. I only planted this strawberry seedling
on Wednesday, and it's already flowering. So, as well as
making sure it is well mulched, I have sprinkled around some
Dynamic Lifter and watered it in (but not too much, the
coming deluge will water in all my fertiliser for me).
Another big job to squeeze in before the rains
come is to yank out all the weeds. I'm down to
my last two square metres of weeding to do, so
it won't take long to pull these invaders out.
While weeding is a dull task, I find that if I
do it in small sections over a week or two, covering
the weeded ground with mulch as soon as I
finish, it's not such an onerous task.

One little trick with pulling weeds is to learn
what "wanted" self-seeding plants look like as
babies. These are two self-seeded Love-in-a-Mist
plants coming up, and there's about a dozen
of them showing up now near the lime tree.
I love the ethereal beauty of Love-in-a-Mist
(Nigella) flowers, and I am hoping that they
will become a permanent part of our garden
without me ever having to plant them again.
Finally, I'm planting out some more of my
supermarket sprouts. This time I am giving some
parsley sprouts a go as a border around a bed. 

I'm not sure how the parsley sprouts will take, but if they work out OK then most of the "micro sprouts" (eg, coriander, chervil, radish, sorrel, parsley) sold in punnets at my local Woolies supermarket can be treated as cheap seedlings to grow in the garden. You can read all about the original experiment here

Parsley has always been a plant which is very fussy about being transplanted as seedlings. The old wisdom is that it's best to grow parsley from seed, so I won't be surprised if my parsley seedlings don't survive. But if they do survive, I guess that will be because I planted clumps of several baby seedlings together, and all I really need from each clump is for one seedling to survive and grow to maturity.

Time will tell, but the first stage of caring for my parsley seedlings is to water them well, and I believe that Huey the rain god has that job covered for the next seven days. Over to you Huey!


Tuesday, August 18, 2015

Nine months later, babies!


No, I know what you're thinking, not the mewling and puking kind. I mean baby plants! 
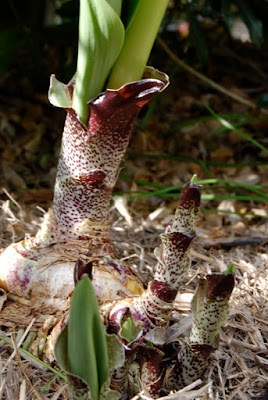
But it has taken a whole nine months of gestation from planting seeds in a pot to having babies make their appearance. In fact it has taken so long that I had even forgotten about them entirely, until this morning, when I spotted the lush, green shoots of my baby Scadoxus coming up. What a surprise, a thrill and a delight rolled into one little pot of green growth. Time for some photos and a few explanations.


Scadoxus babies, in rude green health.

The appearance (on the right) of this sole flowering shoot
has me a bit confused at the moment. Are all the other leaves
attached under the soil to this one shoot, or is this person
just a precocious youngster willing itself into being a
teenager before it's even out of its nappies? I don't know.

Just in case you're a new reader of this
blog and are wondering, quite rightly,
"what in the hell is Scadoxus?" let me
show you this plant, courtesy of a lovely
painting of them in bloom done by
my Pammy (Pamela Horsnell). These
vibrant crowns of orange bloom every
year in September. The stalks are
about 40-60cm tall and the flowers
quite large, about 20cm across at the top. 

We've had our Scadoxus puniceus bulbs here since 2009. They were a gift from gardening writer Geoffrey Burnie, with whom I worked very happily for a number of years at Burke's Backyard magazine. Geoffrey gave me excellent instructions on choosing a spot and caring for them, and every year they flower in spring. The clump of them has been slowly but steadily increasing in size, and the number of flowering stalks has gone from the original three to about 10 this year (I say "about" as not all stalks flower, the younger ones seem to like having a practice run in the years leading up to their first flowering).


At the end of flowering they form large clusters of seed
which start out green (like this) then eventually turn red ... 
... like this. Nowhere near as many ripe seeds as unripe ones.

My online reading about Scadoxus tells me they are both tricky and slow to propagate, and that's been my experience.

Talk about tricky! It's never worked until this year. And talk about slow! I planted the seed in a pot on December 19 last year, and I discovered the seedlings this morning, in the middle of August.

In previous years I sowed the seed around the base of the scadoxus clump, kept the soil lightly moist and well mulched ... and nothing ever happened.

Last December, I decided to try a pot. The seed were not buried deeply but they were fully covered with potting mix, and the pot was placed next to my potted goldfish pond in a spot which was warm and sheltered enough, but gets almost no direct sun at all. The scadoxus pot received regular but not very plentiful watering, living off the scraps of water which fell down onto it as I routinely splashed water around topping up the water in the goldfish pond and watering the nearby orchids.

That's hardly any kind of scientific "how to raise scadoxus from seed" report, but that's how it happened, and it seems to have worked ... so far.

Now I am faced with the responsibilities of parenthood. How to raise the babies ... so many decisions ... where to put them, what to feed them, when to transplant them into the ground. So here's the plan.

I'm putting the pot out where the in-ground scadoxus are. They
love it there, so it has to be the right spot. It's shady most of
the year, but brightly lit. It does get midday summer sun
but not for long. My job will be to keep the little pot moist,
and maybe move it to cooler, shady shelter if an absolute
scorcher is forecast during summer. As for food, not much,
just a few general purpose slow-release pellets.
The usual way that my Scadoxus increase
in numbers is by sending up baby shoots
around the base of each bulb. This they
are doing very readily, with each
mature bulb surrounded by half a dozen
eager youngsters.
How many babies in that pot, one
or five? I'll find out later.
I suspect my baby scadoxus plants might be several years away from ever producing a superb bloom. The plants which Geoffrey gave me were meaty bulbs as big as onions, so my tiny little slender seedlings have quite a few years to go before they reach that kind of muscularity. And of the four bulbs which Geoffrey gave me, one was smaller than the others and so took two years before it produced its first flower. My bet is that if my baby seedlings ever grow up to flower, it could take six or seven years at least for them to do so, maybe more.

But won't it be worth the wait! 
Every year I do a little posting about our scadoxus blooming, and that should be happening within the next two to three weeks most likely.

This year, however, it's the cute little babies which are stealing the show by getting in early. It might have taken almost nine months to happen, but it definitely has been one of the highlights of my gardening year. Such simple fun!


Saturday, August 8, 2015

Use-by dates


Every now and then I put in a burst of growing radishes for salads. Haven't done it for a while, so a short while ago I planted out my fast-growing radish seeds ... and then nothing happened. Nothing at all. Zero, zilch.

Now that is not how radishes usually perform. They're the Speedy Gonzales of the vegie beds, sprouting quickly and ready for harvest a few weeks later. And so I went back to the shed, picked up the seed packet, flipped it over and discovered that my French Breakfast radish seeds were exactly one whole year past their use-by date!

As Homer Simpson would say: Doh!

So then I did a stocktake of my tin full of seed packets, searching for old-timers whose use-by date was up. I am a bit embarrassed to report this folks, but if you include all the seeds whose use-by date is right now, August 2015, about one-third of all my seed packets were tossed into the rubbish bucket in my shed.


If you didn't know there was such a thing as use-by dates for seeds, you do now. Some seeds last for ages (I think the record is a couple of thousand years for certain varieties of sacred lotus) but in the vegie kingdom it's normal for seeds to last anywhere from two to five years, depending on the plant type. I'm not sure how accurate this chart is, but it gives you some idea.


Most reputable seed companies stamp the use-by date on the back of their packets. The oldest one here is for 2012/13, and the others you can see here are all stamped August 2014, one whole year out of date.

Seeds beyond their use-by date might still sprout, but don't be surprised if they don't. That's what the use-by date is all about: the reliability of seeds sprouting. If you are a committed economiser (with the emphasis on 'miser'), and you still want to have a go at sowing your past-their-use-by-date seeds, my advice would be to sow all of the rest of the packet. Some will probably come up, I hope. And good luck!

However, I really do want to grow some radishes, so once I finish this blog posting I'm off to the garden centre to buy some nice, fresh radish seeds.

Tuesday, August 4, 2015

Our wattle does its thing


This is our best-ever case of something not going to plan – not remotely – yet everything working out quite splendidly in the end. 

Our "groundcover" wattle is in bloom again (just like we planned it), right on time in Sydney's sunny midwinter (just like we planned it). So what didn't go to plan? 

Wait till you see the size of this thing! It is most definitely not a groundcover, hugging the ground humbly like it's a living mat. No, this is a triumphant invader of spaces, accoster of innocent pedestrians passing by, a fence-climber and, admittedly, a rather lovely big monster of a thing. Here it is in flower this morning.


The rarely seen front of our house, with the giant groundcover
scaling the front fence, bearing streamers of yellow blossoms.

Seen from the front porch it covers the whole front garden,
rising to the same height as the fence and surround hedges,
a sea of lacy, delicate blue-green foliage throughout the
year, and now, in July and August, the blue sea is foamy with
streaks and bubbles of yellow blossom.
 
Like the foliage, the blossoms are also delicate things, fine
puffballs aplenty, always fuzzy to look at until you're just
an inch or two away.

We don't get as many flowers as we had
initially planned on, simply because the house
is to the north of the wattle, and while it
does get kissed by sunlight through the winter's
day, it's not a whole day of sunlight, and so
the plant doesn't produce a full canopy of blooms.

The innocent vision we had when we planted this lovely thing more than 10 years ago was that it would be a ground-hugging groundcover that was a sparkling sea of yellow through winter. This is what the brochure promised!

Instead, we have a huge plant which scooted along the ground until it came to the first obstacle (hedge or fence) then simply reared up and over the obstacle, hell bent on world domination. Everywhere, it's somewhere between waist and head high. That ain't no groundcover!

Over these last 10 years I have clipped it back from the front fence a zillion times, to stop it dripping and drooping over passers-by on the footpath (and it can be a pain that way during wet weather).

It's a "love it or hate it" plant. One mystery neighbour breaks bits off the wattle as he or she walks by, always leaving them on the nature strip in a silent, wattle-hating protest. 

Other neighbours stop to talk to me about it, and to pat and stroke the foliage as if it was a giant sleeping dog. It is certainly soft to the touch.

It is its own plant, its own personality. Apart from clipping back the overgrowth, I do nothing to care for it. Never feed it, never water it. All I do is admire it.

Pammy says that this year it is looking as nice as it ever has, and I agree.


Sunday, August 2, 2015

Bagging up some spuds


I reckon I must have some Inca blood in my family. Or maybe I just love spuds a lot, and so here I am again, growing spuds at home, this time in a proper 'tatey bag' from Diggers Seeds. 

I ordered mine a while ago, and in mild old inner-western Sydney, where there's never any danger of frosts damaging the baby plants, I figured this warm patch of early-spring weather we're enjoying now is a good time to get my seed potatoes planted in their bag.

First of all, we need some motivation, so here's some of the last crop of King Edward potatoes we grew here at Jamie and Pam's Garden Amateur-land.


Blushed pink, King Edward potatoes are fine all-rounder
spuds, great for chips, roasting or baking in their jackets, and
their fluffy texture produces a truly wonderful mash.
What follows is yet another exhaustive step-by-step of how I do it. Remember though that there are several other methods for growing spuds in a bag, so if somebody tells you that it can be done another way, they're probably right!

Some kind of straw is very handy, especially to form the
base on which your seed potatoes will sit inside the bag.
This is ordinary sugar cane mulch, which worked fine last
time, and which is plentiful and cheap here.
Use home-made compost by all means, but I am giving my
other Tatey bag and half my seed potatoes to a friend, Jolanda,
and so she is going to use this compost to grow her spuds.
Yes, you can use ordinary potting mix, too. But we didn't.
Compost itself is a fabulous gentle fertiliser,
so down the bottom of the bag, where the
roots will go searching for food, I will be adding
a handful of chicken poo. This time I am
using the "reduced odour" version of Dynamic
Lifter, which somewhat spoils the fun of the
whole exercise, but Jolanda's eight-year-old
daughter Elina thought the reduced odour chicken
poo was pretty disgusting, so it's certainly
not odour free.
This is the 'Tatey bag' Diggers provides. It measures
(roughly) 40cm tall, wide and high, and the handles are handy.
The tatey bags come with plenty of holes both in the bottom
and the sides, so water can drain away. You can of course
grow potatoes in a pot, but just make sure it has plenty of
drainage holes in the bottom (not just one, as some poorer
quality big ceramic pots sometimes have). The big plastic
pots usually have plentiful drainage holes.

OK, so they're your ingredients to form the bottom layer of the pot: straw, compost and chicken poo, plus a bag with lots of holes in the bottom.

For the bottom layers, I mix together several big handfuls
of straw with the same quantity of compost.
Then I fill the bag about 10cm deep with my straw and
compost mix. Then I sprinkle a handful of chicken poo over
the top, then cover that chicken poo with another 10cm of
straw and compost. This is an important point: don't let your
seed potatoes come into direct contact with the fertiliser,
so bury your fertiliser deeper than the seedling spuds.
The seedling spuds! Here they are, at last!
Here they are in their paper bag. They've already sprouted.
This is a good thing, not a bad thing. They'll grow quickly
now they are nestled into the rich planting soil. 
Generally, it's a good idea to let your seed potatoes sprout before planting them (this is the process of "chitting" that you might read about). It's not absolutely essential, but it is desirable. You can just plant your seed potatoes even if they haven't sprouted, but they might take a bit longer to get going if they haven't sprouted before planting.  

Place the seed potatoes with the sprouts facing upwards.
I've put four seed potatoes into the bag, and that's about the
maximum to plant in this kind of space.
Finally, I then covered the seed potatoes with more compost.
If you have mixed up too much compost and straw, it is
totally OK to cover the seed potatoes with more compost
and straw, of course. In fact, some potato growers like to
grow their spuds mostly in straw.
Water the bag well with at least half a can of water, and keep the soil in the bag lightly moist. Right now it's still late winter and the temperatures aren't too high, so watering the bag every third day will probably be enough. Later on, as the weather warms up, watering every second day might become the routine.

The best place to put your potato bag is a sunny spot, and that means one which gets at least six hours a day of sunshine, or the closest you can get to six hours.

As for when the first green shoots appear, it could take a couple of weeks or more. Just keep an eye on what happens.

I'm going to update my "spuds in a bag" blog when there is news to report, and I expect about a month from now there'll be a bit more work to do to keep things rolling along.

If you decide to have a go yourself, you can buy everything you need from Diggers Seeds (diggers.com.au) but your local garden centre or major hardware chain garden centre (eg, Bunnings, Mitre 10 etc) also stock "seed potatoes", so you could buy a pack of them and try your hand at potato growing in a large pot, or of course in the ground itself.

Whatever you decide, good luck.