Showing posts with label repotting. Show all posts

Monday, October 9, 2017

The trouble with pots


The trouble I have with pots is that I wax and wane in my use of them. My garden seems to go through cycles ranging from "sorry, we need minimal pots" to "more pots please" ... and right now, I'm swinging back to using more pots.

I have only made this situation worse because last weekend I tidied up my spare pots area, for the simple reason that this unsightly spot used to be hidden from view. Alas, recent garden renovations have removed the dense screen of ginger plants that concealed the pots, and so now my pots area is neatly sorted into sizes and types. 


That's where the troubled brewed up. For example, as I stacked the wide, shallow dish-shaped pots, I thought to myself that they really could contain all the mixed leafy salad greens that two little people could need. Removing the greens from the vegie beds into the pots would then provide more space for my preference — other vegies — or Pammy's preference — more flowers.

The trouble with that idea is that I bought that same wide, shallow pot several years ago precisely to grow more salad greens. I did it successfully for a few years, but it was a lot more work than simply plonking the salad green seedlings or seeds into a garden bed.

And that's the trouble with pots. They seem like a gardener's best friend, a real problem-solver ... but then a few months later you realise that they are more work. They need more watering, more feeding and every second year or so, complete repotting.

Has this deterred me from entering a new cycle of "more pots please"? No, afraid not. 

And no, it's not a tragic cycle. You see, I have more time on my hands now that I am winding down into a semi-retired pattern of work. Several years ago I was much busier, and staying on top of the workload of keeping potted plants happy was more of a chore.

Despite the fact that I seem to be a remarkably slow learner at times, as I am now entering a positive "you can do it" phase with pots, here are several perfectly good reasons to grow plants in pots.


Limit the size of spreading plants. In this case, it's a pot containing all the oregano we will ever need. In a garden bed, oregano can spread a metre or more if it's happy. Here in the pot it has to be content with 30cm. All I need to do is cut it back every three months. Another truly rotten spreader is mint, which you should never grow in the ground if you have limited space. 


Keep fruit trees down to a manageable size. Our potted Turkish Brown fig tree is content in its pot, and so is its close neighbour, a potted Thai lime tree. In the ground, both would grow much bigger, and our garden already has an olive, a Tahitian lime and a Eureka lemon in the ground, so there is no more room.


Put kitchen garden herbs within easy reach. You can almost smell this fragrant forest of young basil, and as well as using leaves for staples such as tomato sauces or pesto, just a few torn leaves tossed into a garden salad works wonders. Other nearby pots contain mint, tarragon, chives, thyme, rosemary and sage.


Grow specialised plants in potting mixes designed for them. Our garden has all sorts of interesting plants, such as this colourful succulent, Crassula 'Campfire', planted into pots containing potting mixes designed to suit them. As well as succulents, there are bromeliads, orchids and water-loving Louisiana iris. Each requires its own special mix, but if you give plants the exact conditions they love to grow in, they tend to be much happier and easier to look after.  

And so all I really have to offer with this posting is that pots are an essential part of any garden. Their downside is that they are more work, but their upside is that they can solve all sorts of problems, and even allow you to grow a much wider variety of plants than if you just tried to grow everything in the ground. And for a plant-lover like me, that final point seals the deal.

I'll be growing plants in pots for all my days here. It's just that every now and then I'll scale back on them for a while, then I'll bounce back a year or two later filled with fresh enthusiasm for them. 

This waxing and waning, of de-potting then re-potting, is just another of life's and gardening's steady little cycles.


Tuesday, July 11, 2017

Going potty in midwinter


"You've been prolific lately on your blog," said our friend and dinner companion, Belinda, last night. She's right, there's a fair bit of gardening going on here, right in the middle of winter. 

Midwinter, while the plants are growing very slowly or even having a snooze, is an ideal time for major projects such as moving plants to another spot in the garden, or minor projects such as repotting them.

Fortunately for my aching back, there were no plants to transplant, but there were some pots in need of attention, and repotting. And happily for this blog, each presented its own different little problem to solve. 

Soil level sinking in the pot: this is the most common potted plant problem. Over time, the potting mix seems to "shrink" in the pot, as the gap between the rim of the pot and the top of the potting mix grows. For my potted Turkish fig, this gap had grown to about 4 inches (10cm), but the potting mix itself was just a year old.


 So the big trick with topping up the potting mix is to add the new mix to the bottom of the pot. Don't add it to the top. 

Why? Just under the surface of the soil, each potted plant has a layer of fine roots which soak up food and water, and smothering this layer with a few inches of new potting mix will not be good for the plant's health at all, as it will cut off a vital food supply. So, measure how much you need to raise the soil level, pull the plant out of the pot, add that same depth of mix to the bottom of the pot, and replace the plant.

(That's easier said than done, of course. Removing plants from pots can be very hard if the plant has been there for years, or if the pot doesn't have straight-ish sides. One tip is to water the pot very very well, leave it for half an hour, then try again. Good luck!).


An extra thing I do for all my repotted bigger plants is to soak them while they are out of their pot. Plastic trugs are fab for this (for Australian readers, you can get them at Bunnings in the section which sells laundry baskets and other plastic storage items). I add the pot to the trug, fill with water then add in a few capfuls of Seasol Super Soil Wetter, which is a mixture of wetting agent and Seasol. If your potting mix looks very dry, this stuff is very good at making it not only wet again, but also able to absorb moisture when you next have to water it. Think of it as a gentle, healthy tonic. Leave your plant to soak in it for at least 15 minutes, up to half an hour if you like.


Generally grumpy plant not responding to kindness: this is what was happening with our potted Thai lime. I was really nice to it (I thought) but its leaves looked crappy and its fruit crop was wimpy. When you have a pot plant that is generally unwell, it's time to remove the plant from the pot and have a look at what's happening out of sight. Whether it's white curl grubs eating the roots (a very common problem) or ants (another common problem), or super dry potting mix super soggy mix, you'll soon spot the trouble.

And this what I found: an ant civilisation. Not just a nest but a whole city of the little things. I could swear I could see ant apartments, ant bars and hear ant jazz music playing. It was all my fault. 

Super dry soil was the cause of it all, the ideal conditions for ants to go to work. Despite what I thought was pretty diligent watering, the soil had gone dry at its lower levels, and water I applied via the hose just rushed by without wetting a thing.


This is beginning to sound like an ad, but I added the whole rootball to the trug filled with Seasol Super Soil Wetter and left it to soak for half an hour. Don't worry, it won't drown, but the ants will! Meanwhile, I put on my Vlad the Destroyer hat and cleaned the lime tree's pot with a scrubbing brush so it was ant-free, and cleaned under the pot, too, which was thriving with ants and a layer of finely crumbly, sandy potting mix detritus.

AND ... as the fine roots around the edge look a bit pot-bound, I also use a fine knife to cut several vertical slits all the way round, to tease out the roots a bit and encourage them to grow a bit more.

Upgrading to a bigger pot: this was the easiest assignment of the three jobs. The NSW Christmas Bush was perfectly happy and had put on its best, longest lasting display ever last year. We just felt it was getting a bit too big for its current pot, so we had another pot spare which was one size larger (just a few inches bigger in height, and width).


There's just a few important little things to remember with a job like this:

1. Upsize gradually. Don't repot into a giant pot, just move to the next size larger.
2. Use a specialised native potting mix for natives. Normal potting mixes for other plants contain too much fertiliser and the wrong type of fertiliser and can actually harm a native plant. Native potting mix isn't hard to find (mine was made by Omsocote, sold at Bunnings).
3. After repotting, top up potted plants with some mulch. I just use the same ordinary sugar cane mulch that I use in the rest of the garden, and it's very effective at suppressing weeds in the pot. Those weeds which do appear are easier to pull out and control, too.

There's a fair bit more that I could say about keeping potted plants happy, but I'll save that for a later posting, probably in spring.


Monday, September 13, 2010

Germ-free repotting


I was reading in a history book recently about the dreadful standards of hygiene in hospitals back in the 18th and 19th centuries, and it occurred to me that sometimes the standards of hygiene in the plant hospital out in my own backyard were little better. So, while I knew that I should sterilise secateurs when moving from one plant to the other during a pruning frenzy, I wasn't all that meticulous about it. Just think about it. A doctor comes in and says he's going to operate on you, using the same, uncleaned, instruments he used to operate on the previous patient. No way! The same goes for the hospital beds – you wouldn't want to get into the same, unmade hospital bed previously occupied by someone else. Yuk!

So, repotting my recent purchases was the perfect opportunity to put my new-found zeal for cleanliness into action, so here's how the germ-free repotting at Garden Amateur's reformed 21st-century plant hospital went.

Told you the standards of hygiene have improved. Bucket of warm water with a couple of glugs of disinfectant Pine-O-Cleen added. Scourer pad awaiting duty.

Six previously used pots to clean. The first step is to wash out all the old soil and scrub it down. (This is my birdbath cleaning brush, worn down into a birdbath shape over many years.) Once each pot was mostly clean, it then got the scourer-and-disinfectant treatment to get it up to hospital standards.

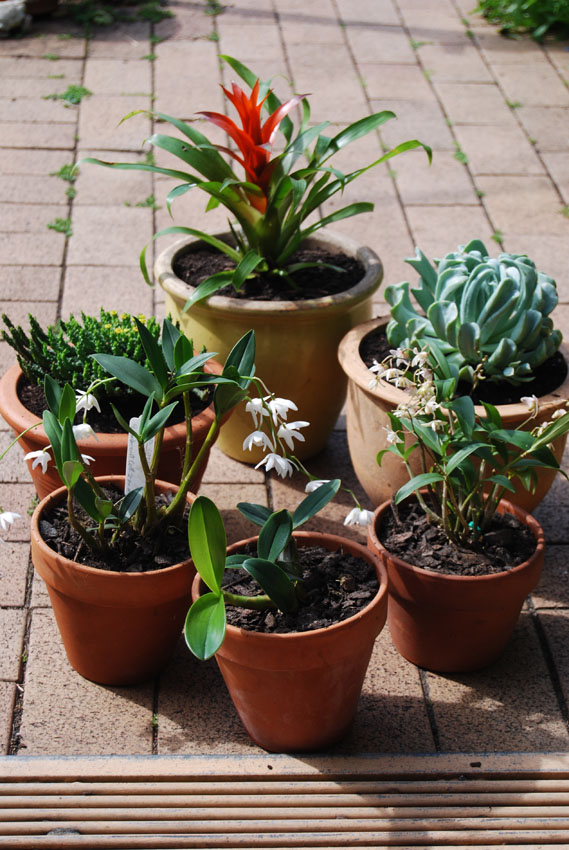
And here they are now, clean, germ-free and ready to take on their new occupants, hopefully for several years at least. All this cleaning is important. Just like people, plants get sick, suffer diseases, viruses and other ailments. The pathogens can lurk in the leftover potting mix and will potentially attack any new plants added to the pot. So, a bit of cleanliness lowers the overall mortality rate, just as it did once reforms to hospitals were made.

I love my plastic trugs, they get used for so many jobs in the garden. I have three in my shed, and two of them were indispensible this afternoon. This green trug was my repotting area for the orchid, catching all the old orchid potting mix, so I could work without making a major mess just outside the back door.

Unpotting plants is one of the most revealing things you can do. This is not the first time I've unpotted an orchid and found styrofoam chunks instead of orchid mix. I just don't like the look or the idea of styrofoam, even if I suspect it works quite well to improve soil drainage.

This is the dendrobium orchid after repotting. I use a specialised orchid potting mix for all my orchids. It looks and feels like composted chunks of bark, and it's very coarse indeed. In nature, orchids don't grow in soil, so ordinary potting mix isn't right for them. Orchid 'roots' cling onto branches or trees or rocks in nature, and so orchid potting mix is just a coarse, very free-draining medium for the roots to cling onto.

For the bromeliads, I mix up ordinary potting mix with orchid potting mix in a 50:50 ratio. Again, I use a trug to make this job easy, just adding three scoops of orchid mix to three scoops of potting mix, and mixing it all up well. Like orchids, bromeliads don't grow in soil in nature – they also cling onto tree branches and rocks, and the main thing they need is very free drainage in their growing medium.

Succulents do grow in soil in nature, but usually it's sandy, crappy quality soil, and so for them I use a specialised cacti and succulent mix. However, you could use a home-made 50:50 blend of ordinary potting mix and clean, coarse sand. The specialised potting mix is very coarse and sandy, providing the excellent drainage that succulents like. I only use the specialised stuff due to a certain laziness, I guess. I really should mix up my own stuff and buy less 'product'.

It only took about an hour from beginning (scrubbing) to end (taking this photo), but I am always very pleased to see plants in nice terracotta or glazed terracotta pots. I'm not sure whether it is OK to repot native orchids when in bloom, but I repotted the ones I bought in bloom last year, and that didn't affect them then and they are blooming nicely now, so I just figured they must be so tough even I cannot kill them.

Instead of just doing a blog about repotting, I thought I'd introduce the 'hospital cleanliness' idea as well, because reading that book about the appalling hospital standards a couple of hundred years ago did make me think about my standards. That's because the only things I am ever going to 'operate' on are plants, and as they are living things just like me, subject to diseases, they really do deserve at least a basic level of good hygiene, and in return more of them might thrive here in my garden.