Thursday, July 31, 2014

Rocket/arugula growing & harvesting tips


So you don't like rocket (or arugula)? Too peppery, eh? You're not alone if you just can't see what others see in rocket, but please believe me when I say countless restaurants keep on dishing up the wrong stuff. And many backyard gardeners leave it too late and eat old, peppery rocket rather than the lovely, young, nutty-flavoured salad green that we love to eat.

There are in fact many different types of rocket, but here in Australia you come across two basic types. Both can be hot and peppery if the leaves grow too big, and both can be utterly wonderful in salads when the leaves are harvested young. These two types are commonly known as "wild rocket" (the one with serrated leaves) and "cultivated rocket" (the one with more rounded paddle-shaped leaves). Here's some pix to make it clearer.

Wild rocket, otherwise known as Diplotaxis muralis or Diplotaxis
erucoides. The one with the serrated leaves is what you most
commonly find in Australian greengrocer shops. To cut a longish
story short, this is now my favourite rocket to grow at home. As
for the reasons why, read on...

Cultivated rocket (Eruca vesicaria ssp sativa). This stuff looks
and tastes lovely when very young, like this pot-full, but neglect it
and in a matter of weeks it's too big, too peppery and you have to
start all over again. Thank goodness it grows so fast but it is a
fair bit of work keeping a good steady supply of baby rocket
like this growing along. I could never manage it properly.

I am sure the suspense is bearable, but if you're still with me, there's a number of reasons why I recommend growing wild rocket at home, rather than cultivated rocket.

1. Wild rocket is a perennial plant. It lives for a number of years, while the cultivated type of rocket is a completely different thing. It's an annual, and its useful lifespan in the garden is just a couple of months at the very most.

2. You can grow wild rocket very well from seed or seedlings. I find that the cultivated type of rocket grows much better from seed. Sure, seedlings are sold in nurseries, but that means a cultivated rocket seedling might only be usefully nutty and pleasant in flavour for about a month, before it becomes too peppery.

3. Wild rocket just keeps on coming back if you harvest some regularly. In fact, that's the trick to growing and using it – harvest it often. That way the plant is covered in new, tender, nutty, baby leaves pretty well all the time. When harvesting yet another handful for a mixed salad, if I see a big leaf has somehow miraculously made it to that big size, I cut it off and leave it there on the ground as mulch.

So, is there any reason why cultivated rocket is worth growing in the garden? Of course! It has a superb light texture and nutty flavour when served as a salad of baby leaves. What I mean by 'baby' leaves is small, paddle-shaped guys less than 10cm (4 inches) long, such as in my potted photo above (and below). This is the kind of nutty, tender rocket which you can have a whole salad of on its own. (The wild rocket isn't such a dazzlingly lovely thing in a whole salad on its own. It's at its best in a mixed leaf salad, in my humble opinion).
Another great reason to grow cultivated rocket is the sheer sporting good fun of having something grow at lightning speed. It's a terrific plant to include in a kids' patch of plants grown from seed. Sow whatever you like, but the rocket will almost certainly come up first, usually in four or so days (depending on the weather).

Growing cultivated rocket from seed: as for how to sow the seeds, try this simple method…


The seeds are tiny. So set up a pot of potting mix. You don't need
a deep pot, either – a wide shallow one is best. Scatter the seeds
over the mix evenly (one teaspoon of seeds should cover a pot
about 30cm across at the top).
Once you've scattered the
seeds over the surface, cover with (ideally) a fine layer of
seed-raising mix (popular here in Australia) no deeper than
2-3mm deep (that's thin). Some overseas readers have in the
past asked "what is seed-raising mix?". It's a fine, light, sandy
propagating mix. You should be able to find something similar. Water
the soil surface with a fine, misty spray and leave it be.
Your seeds should come up that week, if you sowed them on the weekend. If the weather is warm, lightly respray the pot every morning. Once the seeds come up, keep on watering the pot every day, or every second day at least. After two weeks give the pot a light liquid feed, and keep on lightly feeding every fortnight.

Harvesting cultivated rocket: now, here's how to make short-lived cultivated rocket last a bit longer. When the cultivated rocket is about the size (leaves 7-10cm tall) in the photo below ...


… get out a pair of scissors and cut about half a pot-full down near to the stumps of the plants. You'll get a nice bowl-full from that, which you can enjoy soon after as a baby rocket salad, maybe drizzled with the finest olive oil you can afford, some balsamic vinegar or some vino cotto.

Then feed the pot again soon after. Yes, it's a risky manoeuvre cutting the plants down to their stumps (ie, it doesn't always work!) but I find eight times out of ten I'll get a second crop if I fertilise the pot soon after this radical harvest. So, for this one 30cm pot, you should get at least four nice baby rocket salads before the plants start to become a bit too tired for too many more deep cutbacks down to the stumps.

Growing wild rocket: as for growing the wild rocket that I prefer, I think it'd be best to grow it from seedlings. You'll only need a couple of plants, and they should live on for a few years, and so a packet of 500 seeds seems just a bit wasteful (and silly) to me. 

It's not a bad time to plant rocket now, as spring is just around the corner, and this is one plant that loves spring and autumn a whole lot more than it likes Aussie summers (which is not a lot, in fact).

Finally, for more on other rocket varieties, there's no better blog than Michelle's "From Seed to Table" and her experience with growing rocket is well worth reading.


Tuesday, July 29, 2014

Pop!


Pammy likes poppies. I like poppies. And poppies are so easy to grow. They flower in the middle of winter, they sway on long slender stalks, the unopened flower buds look like stubble-haired punks, and they put on a nice show in all sorts of colours. 

And that's why I plant poppies every year. Growing tips? Toss seedlings over your shoulder and walk away. The poppies know what to do…

OK, that's a slight exaggeration, but these Iceland poppies really do love life, and I can't begin to tell you how much it makes me smile and feel colourful inside, just to see them again.


Tuesday, July 22, 2014

Winter's pleasant depths


Do you find that on today's internet you often read stuff that's of interest, but only a few days later you can't remember exactly where you read it? It's a case of "that was a thousand clicks ago, how can I remember that?".

Well, I'm pleading a case of thousand-click memory loss, but I was reading some Australian gardening content last week – not a well-informed blogger, it was some fool doing it for money – who was banging on about the grey, gloomy depths of winter, as if they were living in Europe or North America. I wandered outside into my admittedly chilly-ish garden and all I could see in the depths of winter here was lush greenery and a beautiful array of colours.

And so for this little posting I would like to celebrate the depths of winter here in Sydney, Australia. When the cold winds blow from the south you certainly need jumpers and jackets, and slow-cooked casseroles still taste fab once the sun has gone down, but out in the garden there's plenty of colour to enjoy.


Squadrons of bees are feasting on the lavender, their little black
legs glowing golden with collected pollen.


The bromeliads enjoyed the World Cup action in Rio, and wish
they were back home in South America, but Sydney is OK.

Even the bromeliads waiting their turn to
flower can at least wear nice variegated fashions.

My 'hedge' of chervil is at its peak. The flopped
over bits in the foreground are merely drunk on
the drink of fresh water I gave them a few
moments before I started snapping pix. They'll
sober up soon enough.

Kalanchoe 'Copper Spoons' is loving the cooler weather.
I'm trying to strike lots of babies of this lovely thing. No luck
yet, but it is a slow process, I believe.

And the Crassula 'Campfire' is well and truly ablaze.

The new mint growing in the 'spot from hell'
under the adjacent grevillea is loving its first
few months here, but it needs lots of water to
keep this backlit beauty happy.

A Christmas gift poinsettia pot which Pammy
is taking a special interest in is doing what it
does naturally in the cooler months: blush red.
And finally, this single tibouchina bloom doesn't
know it's winter. It's meant to flower in autumn,
so either it's early or it's late, but it's on its own, the 

only flower on the bush at the moment.
And so that's the depths of winter here right now. Yes, growth is slow, but everything is still steadily growing, and for some plants it's their most beautiful time of year.


Sunday, July 20, 2014

Deep-fried Quail


Though I've been cooking for 50 years now, it's only in the last 12 months that I have become truly comfortable with deep-frying. Before then I had done it several times (but not a lot) and the results were pretty good, but I never felt truly comfortable and happy working with all that bubbling hot oil. It was just a bit scary, and to my mind cooking shouldn't be scary.

All that changed when I started deep-frying in a wok, and that's because I started cooking Luke Nguyen's Spicy Deep-Fried Quail the way he suggests, in a wok. Much easier.

Deep-fried spicy quail, cooked in a wok.

And so while my garden is almost asleep in this, the coldest winter we've had in Sydney for several years, I'm busy in the kitchen keeping our hard-working artist, Pammy, well-fed while she produces 31 paintings in 31 days for an upcoming group exhibition called – you guessed it – '31 Days'.

For overseas readers, if you are thinking "who is Luke Nguyen?" he is a Sydney restaurateur and TV presenter whose travel and food shows are well worth seeing, especially those celebrating the food of Vietnam and South-East Asia. What follows is his recipe, in words and photos, as cooked by me.


First, cut out the backbone of 6 quail. (These little birds are
most often bought in a 'tray' of 6 birds here in Sydney. One tray
costs $15 in Marrickville, but it might cost more elsewhere.)
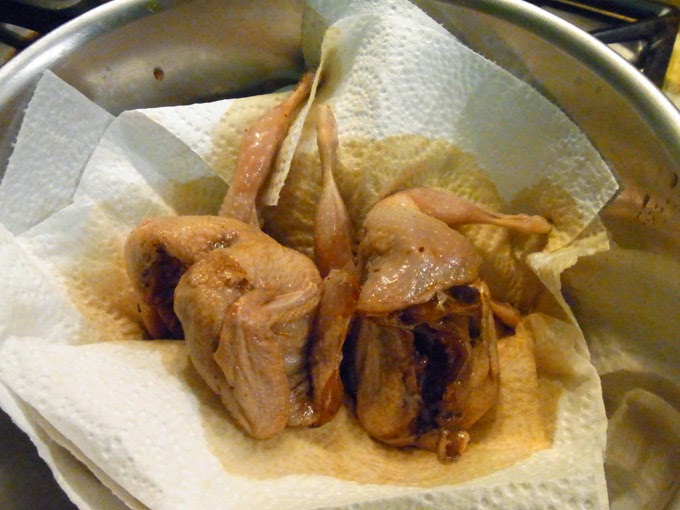
Then place them in the marinade for a few hours. Just before
deep-frying, take the quails out of the marinade and pat-dry
with paper towels, as pictured here.
Here's the marinade recipe.

1 teaspoon dark soy sauce
1 tablespoon soy sauce
1 1/2 teaspoons salt
2 teaspoons sugar
1/2 teaspoon five spice powder
1/2 teaspoon ground ginger
2 star anise, crushed (I do it in a mortar & pestle)
1 1/2 teaspoons Shaoxing (Chinese) cooking wine
125 ml water

The Shaoxing cooking wine is readily available in any Asian food store. It's cheap, too. A 750ml bottle is just $1.30 here in Marrickville.

Next, get that oil in the wok up to the right temperature before adding the quail!


I use a temperature gauge (available at cooking supply stores.)
This comes with a long 'probe' that sits in the oil, plus a little
clip that holds onto the side of the pot. There's even a little sliding
pointer that you can move around to the desired temperature
setting. In this case that's 180°C.


For this recipe I use 1.5 litres of Rice Bran
Oil. I prefer this oil as it is one of the few oils
available which is free of unhealthy Trans fats.


I won't bang on too much about Trans fats here,
but they are actually banned in some European
countries, but here in Australia it is quite hard to
find oils which are completely free of them. Have
a look at the labels on all the common cooking
oils next time you're at the supermarket, and
you might be surprised how many have Trans
fats listed. Rice Bran oil is free of them.
What's so bad about Trans fats? Here's a link.
OK, so we've got our ideologically sound oil up to 180°C, next step is to add three of your 6 quail. Woo-hoo! Action!


This is where I  conquered my fear of deep-frying. It looks very
spectacular but is quite stable. Enjoyable in fact. Let the quails
deep-fry for 5 minutes exactly.
As soon as you add the quails you'll notice that the temperature
of the oil drops from 180  down to about 160. Don't be tempted
to turn up the gas flame (or the heat) to compensate. It's okay!
At the end of 5 minutes, scoop out the quails onto paper towels,
then wait a minute or so and the oil will be back to 180°C,
ready for the second batch of quails to be added to the oil.

The quails come out looking lovely. Once the second batch is
cooked, cut each quail into four pieces (two drumsticks plus
the body of the bird cut in two down the breastbone. A Chinese
cleaver does it so easy, but any big knife will do the trick.

Well before you started cooking, of course you were so well
organised that you made the lemon pepper dipping sauce,
whose Vietnamese name is Muoi Tieu Chanh, says Luke. 

(But I suspect there's a few accents on various letters
in that name, so forgive me for not knowing them.)
To make the dipping sauce, combine 2 tablespoons (homegrown) lemon juice with 1/2 teaspoon salt and 1 teaspoon fine white pepper. Stir to combine (the pepper can clump up a bit, so stir very well to make sure it is all truly combined). And no, you cannot use black pepper. It has to be white pepper!


Finally, serve the quails on a bed of salad,
with the dipping sauce on the side.


Luke suggests a salad of tomato, Lebanese cucumber and water cress, but I've replaced the water cress with crispy lettuce tossed with (home-grown) wild rocket. (And I'll be doing a blog on that wild rocket soon. Such a good vegie garden plant!).

And so it's thanks to Luke Nguyen and his recipe that I now feel not only confident about deep-frying but actually quite interested in doing a bit more from now on. When you deep-fry correctly, with the oil at the right temperature, the results are not at all oily. The meat is instantly sealed and crispy on the outside, juicy on the inside. All the oil stays in the wok and the result is very, very delicious.