Sunday, December 29, 2013

2013 - the year in review


Well, 2013 was an action-packed year here at Garden Amateur land. Early on in the year I lost my job and became an involuntary semi-retiree. That's the bad news (and it actually turned out to be not so bad after all).

The good news is that Pammy's career as an exhibiting artist is really getting up to speed, and our lovely little garden has continued on its way with its usual combination of flourishes of growth, productive crops of produce, seasonal colour… plus mini-disasters (thanks mostly to Huey the weather God and the Insect Pest Garden Munchers Union). So here's a few photos to show what happened, plus we pick our prize-winners of the year, and look forward to 2014.


Gardeners love talking about the weather, and
on January 8, we had some news to report:
The Hottest Day Ever in Sydney. It was ridiculous,
45°C, or 113°F. And that just set the tone for what
has turned out to be Sydney's hottest year ever.
It was our hottest, driest winter ever this year,
then we went through a super hot October as well.
The final ever issue of Burke's Backyard magazine,
the March issue, hit the newsstands with a
wonderfully memorable cover (that went on to
actually win the Maggie Award for best home
& garden magazine cover of the year). And so
with the closure of Burke's Backyard after 14
happy years there, I was looking for work.

Fortunately for me, the first few months of part-time
work consisted of helping Don Burke to research and
write his new book on herbs and spices
But all of that finished by May, and since then (and for the rest of this year) the best I have managed to do is find whatever casual work I can scrounge as a writer and sub-editor. Some old friends in the publishing industry have been very kind and supportive and so I have found a fairly steady supply of part-time work, enough to pay all the bills, and I am loving it. I never thought I'd be a retiree, but I did turn 60 this year, and I'm now looking forward to a life where I work just 20 or so hours a week, and spend a lot more time gardening, reading and pottering about.

And speaking of pottering about the garden, here's a few snaps of some highlights for me in this, our 22nd year here in our little Marrickville backyard.

Most welcome garden visitor of 2013

This year's winner is the native blue-banded bee, who made his
or her presence felt with some very loud buzzing, plus a curiosity
that borders on nosy-ness whenever I enter its space. Read about it here.

Vegie of the year
A scene stealer, and delicious, too, this is Collard Greens,
a classic vegie of Southern USA Soul Food, grown from seed
that came with my Soulicious eCookbook. Read about it here.

Flower of the Year
A sentimental favourite, our Love-in-a-Mist blooms, which were
started from seed, put on a pretty show. I haven't grown them
for a few years, but this year I have saved lots of seed, so I expect
that I'll be blogging on either my success or failure as a seed
saver and grower sometime around spring in 2014.

Parent of the year, 2013
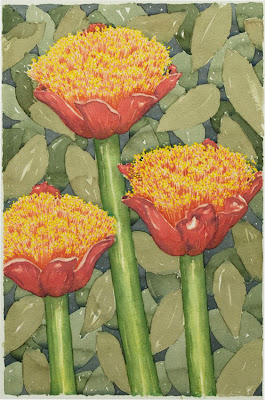
What a memorable show our Scadoxus puts on every year,
and this year was no exception. The wonderful news is that
our scadoxus is loving life here so much that it is sending up
baby plants around the base of each bulb, and all bulbs are
now blooming. I have optimistically gathered its seed and have
sown them direct into the ground nearby as well, but I have
been told germination is iffy and slow, so we'll see how that
little experiment goes sometime into 2014.

Artist of the Year 2013
OK, I plead guilty to nepotism, but Pammy's work
as an artist really is blossoming into something very
exciting. She participated in several group shows
this year in a number of galleries (but most notably
at Gallery Red in Glebe) and her solo exhibition at
the Eden Gardens Garden Centre has already
recorded lots of sales, and Eden Gardens has
extended its run until February 5, so if you thought
you might not find time to see it before its old
scheduled closing date in early January, you now
have one whole month extra to get along there.
You can read more about her show here.
For the record, Pam wins dinner for two with her favourite garden blogger. (And here's hoping she chooses me.) So here's a few more images from our Artist of the Year, Pamela Horsnell.


And to finish off, here's wishing all my fellow gardening bloggers and my lovely blog readers and commenters a very happy New Year and a wonderful 2014.

As well as marking up my 60th year here on planet Earth, my blog notched up its fifth birthday last June, my little spinning globe visitor-counter on my home page, which has only been running for a couple of years, spun past its 200,000th visitor just before Christmas, and my Google Stats, which counts the number of visitors here since the very beginning, tells me that my quiet little backwater of a Garden Amateur blog will log up its 500,000th visitor sometime in March 2014. That's a lot of people to thank, so I'll just quote one of Marrickville's most famous sons, and say "I love youz all".

See you in 2014!


Monday, December 23, 2013

Thai lime time


Just in time for a summer of Thai-style salads, our Thai limes are ripening so nicely on their little potted tree that I want to pause for a moment and admire them. As is the case whenever I post a frangipani photo, with these Thai limes I'm sad that I can't include a 'scratch-and-sniff' widget on my blog so you can experience the amazing fragrance they possess. There's nothing else like them.

Sadly, they have a face only their mother could love, all
wrinkled and disfigured like they're a green gargoyle.
And cut one open and the disappointment continues: lacking
in juice, filled with tiny seeds, it's not a lime for squeezing.
One saving grace is that they're still cute when they're babies.
And here's the Thai lime compared with its silky smooth, juicy
cousin from Tahiti. I think every cook's backyard ought to have
both limes growing (well, if your climate is right for them, that is),
as I couldn't do without either ingredient in my kitchen.
With the Thai lime (also called a makrut lime or a kaffir lime)
it's the grated green skin which adds so much flavour to salad
dressings, stir-fries, soups and other dishes. Its fragrance is so
amazingly spicy and tropical as you grate it finely.
These are the quirky 'double' leaves of the Thai lime, with a
waist in the middle. Naturally enough their flavour and fragrance
is similar (but not identical) to the grated rind. Depending on
the recipe, you can slice these leaves into fine shreds, or go
one step further and chop the find shreds into very fine bits.
For the record, the Thai lime is Citrus hystrix. It's a small-growing tree that usually doesn't grow much bigger than 1 to 1.5 metres high. Being a small plant, it's one of the best citrus to grow in pots, but its branches are a bit thorny, so you need to be careful where you place the pot so it doesn't hurt any little people playing near it or anyone else just walking past it.

It's a typical citrus in that it loves sunshine plus regular watering and feeding. Here in my Sydney garden it seems a bit less fussy to grow than my Tahiti lime and my Eureka lemon, both of which are regularly targeted by sap-sucking bronze orange and spined citrus bugs, plus aphids. The Thai lime isn't such a crock in those ways, but the citrus leaf miner which causes unsightly, squiggly markings in the leaves, does get stuck into it. I use an organic horticultural oil spray (sold here as either Eco-Oil) to prevent the leaf miner attacks, but you need to reapply it regularly to win that little battle.

FInally, a little recipe for a Thai salad dressing, featuring both my limes. It's very simple:
1 tablespoon Tahiti lime juice
1 tablespoon water
1 tablespoon fish sauce
1 teaspoon grated rind of Thai lime
1 pinch sugar

Combine in jar, shake. Pour just before serving. The water 'softens' the bite of the lime juice and fish sauce and the sugar is important for balance. You can of course add chopped chilli to taste, and include chopped Thai lime leaves in the salad greens component of your salad.

MERRY CHRISTMAS EVERYONE!

With Christmas almost here our Australian-style festive fun this year is going to include prawns, oysters and other seafood, plus salads on the side and lots of fruit to finish. However you choose to enjoy the season, both Pam and I hope our small band of blog readers enjoy a merry, safe and happy Christmas, and a prosperous New Year. 

Pam and I are looking forward to keep everything rolling smoothly along into 2014, after a 2013 which has been very eventful – including my beloved 'Burke's Backyard' magazine closing down after 14 great years, and Pam doing more (successful) art exhibitions than ever before. It's been a tumultuous and busy year for us but the good news is that it has all turned out OK by year's end. We're looking forward to 2014 being a better year, and that's what I wish for all of you, too.


Saturday, December 21, 2013

Pammy's art demonstration, Sunday Dec 22, from 2-4pm


Here's a quick little reminder for Sydney-based Garden Amateur blog readers, that tomorrow afternoon, Sunday December 22, from 2-4pm, Pam will be doing a live demonstration of how she works on a botanical painting at the Eden Gardens Garden Centre, at Lane Cove Road, North Ryde. So, if you're in the area, drop in and check out Pam's solo art exhibition, "Inspiration & Observation", and come on over to say hello. We'd love to meet some of our lovely blog readers, and I know you'll enjoy Pam's exhibition and demonstration.

Here's a few examples of the pieces she has in her show, which has 52 artworks for sale in all. And here's a link to her new website, which has many more images to browse.


Friday, December 20, 2013

Homegrown content


I was cooking a basic little meal for the two of us last night and, as usual, I took a moment to think about the homegrown content in that meal. I do this almost every time I cook, as there's always something from the garden in most evening meals. Here's what was homegrown last night.


It's no fantasmagoria of self-sufficiency, it was just a typical night. The potato salad (shop-bought spuds) included homegrown radish and green onions (shallots), and the tomato salad was homegrown cherry tomatoes plus homegrown basil. The fish that I grilled came from the fish shop.

I can't remember how many times people have asked me if I grow all the crops I eat at home. The answer is always "no, I'd need an acre to grow all our own food, and it would be a full-time job to keep up the supply." 

Instead, all I like to do is grow enough edibles in my garden to have some homegrown content in most meals I prepare. Herbs often fit that bill, but it is nice when vegies get to be the star turn. 

And that's what most backyard food gardens are all about. A bit of homegrown content, the occasional star turn, rather than the self-sufficient organic farmer fantasy.


Sunday, December 15, 2013

Festive snacks


Last night at a pre-Christmas gathering with friends, almost all my favourite snack temptations were on offer: potato chips, a board full of cheeses plus a selection of crackers; dips and flatbreads… and I tucked into all of them. But there's another festive snack that I'm enjoying yet again around Christmas time, and it's home-grown cherry tomatoes.

Whenever I water the garden in the
mornings I snack on one or two of
these little beauties. When you bite down
on the firmish skin of each little red
globe they explode in your mouth with
one of the most intensely tomatoey
flavours you can find. Delicious.
I have just two pots of these guys
growing here; that's enough to provide
a glut for two people when they get
into serious summertime production.

I grow them from seed sown
in September or October
(whenever I get my act together).
I find it's getting harder to find
dwarf tomato plants either in
seed or seedling form. Most
grow too big for my little garden.
These Yates seeds are the only
ones I can easily find, and while
they aren't heirloom toms, I
don't really care. They've done
 a great job for me over the years.

Tonight I'm going to harvest a punnet's worth of our cherry toms, chop them in half and toss them with some already cooked, still warm asparagus to make a warm red and green salad. Dressed with a splash of olive oil and Vino Cotto (think 'balsamic', but it's not; Vino Cotto is made from grape must and red wine vinegar, and is a pink colour and has a light, sweet flavour all its own that's not really anything like dark and sweet balsamic vinegar). Grilled salmon steaks go with the warm salad, but I know it's the cherry toms that will probably be the star of tonight's quick little meal.


Saturday, December 7, 2013

Pammy's art show


This year has gone by so fast for both Pammy and myself, partly because it has been so eventful in a positive way. For Pam, it has been an incredibly busy year, partly because she has been working hard to complete the 52 paintings which are on show now at the Eden Gardens Art Gallery, which is inside the Eden Gardens Centre on Lane Cove Road in North Ryde, here in Sydney. edengardens.com.au

Tomorrow afternoon (Sunday December 8) from 2-4pm we are having a nice little 'opening' event (with the usual gourmet cheese, wine and crackers) so if any gardening blog readers who are in the area want to come along and say "hello", please feel very welcome to do so. I'd love to meet some of my blog readers, and so would Pammy.

Here's your official 'invite' to the show. It's
on from now until January 8, so there is
plenty of time to pop in and have a look.
Pictured below is a small sample of Pammy's work that will be for sale at her solo show (an original artwork makes a great Christmas gift!). She works in a variety of mediums, including watercolours, pencil and linocuts, and her treatment of each subject differs depending on how she responds to it. You can also see more of Pam's artwork at her new website, www.pamelahorsnell.wordpress.com
AND, Pam will be back at the Eden Gardens Gallery on December 22, from 2-4pm, doing a demonstration of how she works. So if you can't make it to the opening tomorrow, this is another good opportunity to pop in and say hello. We'd love to meet you.


Sunday, December 1, 2013

Getting closer to nature


"Isn't nature wonderful?" Pammy said as she looked at this image, below.


What is it? It's the seedpod of a native water plant, nardoo,
when viewed through the microscope she bought for me.
And she's right, viewed from far away or up close, from any
angle at all, nature is endlessly fascinating.
Pop a parsley seed under the microscope and it's very easy to
see why this tough looking customer takes three or four weeks
to soften up so it's ready to germinate.
Here's that nardoo seedpod sitting on a slide.

The microscope itself is nothing flash, just a
reasonable quality kids' beginner model. And
the camera used to snap the pix is just my
little pocket-sized Ricoh CX2 digital. 
While I was having fun yesterday afternoon looking at all sorts of seeds up close, it did occur to me that one of the best ways to get children to fall in love in nature is to show nature to them up close, via a microscope. Even a smear of water from a puddle put on a slide will reveal a new micro-world of wriggling living things it's hard to image could exist. And seeds are such hugely variable and easy-to-gather subjects for a beginner on the microscope.

Back to the original photo, of the nardoo pod, I should just fill you in on what we are looking at, close-up. Pictured below is the pond that is home to our now four-year-old goldfish, Paul, where his watery home is topped by the floating fern, nardoo, and a growing forest of Louisiana iris plants.


The nardoo is called a 'floating fern' as that is
what it does on our inland waterways.
Pammy noticed yesterday that it was setting lots of seedpods,
and brought me some to look at. (Forgive the wire cage, but
it's over part of the pond to discourage that persistent predator
of Paul, known as Pussyus cattus.)
The nardoo seedpods are quite small, and a bit hairy, too.
Split one open and it seems like you are looking at its tiny seed.
Pop the pod under the microscope and there's another layer
of activity going on. At the bottom left it looks like the mini-pod,
with the wide open mouth, has disgorged its seed, while in the
centre of the image the mini pods' mouths are still closed
tightly around what looks like the real seed. I'm just guessing
this is so, but seeing such detail reminds me that what I see
with my unaided eye might not be the whole picture at all.
This might look like a photo taken by a space explorer vehicle
of the close-up of a distant moon's frosty surface, but it is in
fact the seed of a chilli pepper.
Pammy's gift of that microscope a few years ago was an inspired choice, as she knows that the "amateur" part of my Garden Amateur name has nothing to do with commerce, and everything to do with my secret life as an amateur scientist and backyard naturalist. Thank you Pammy, and thank you Mother Nature!


Friday, November 29, 2013

Easy greens


One of the real pleasures of having Greek neighbours is occasionally tasting their wonderful home cooking. Our neighbour Katerina is a champion baker of biscuits and maker of dolmades, but a while ago she taught Pam how to cook their traditional dish of mixed greens, called horta, and gave us a container of it to try. 

Horta is just boiled mixed greens dressed with olive oil and lemon juice, and it's wonderful. As a result of Katerina's introduction, I bought some chicory seeds and have been waiting these last couple of months for it to get to the size when we can start harvesting leaves for making our own home-grown horta.

Here's the Chicory 'Spadona' ready to harvest.
I took only half the leaves from each plant, and
as well as the Spadona variety I have another
planted, with more serrated leaves.

Quite a mouthful of a name, Cicoria Catalogna Puntarelle
Brindisina. Both seed packets came from the online seed
retailer, The Italian Gardener, whose prices and generous
seed packets seem very good value to me.

While Katerina says she uses chicory for her
horta, she says you can use any leafy greens
you like. Traditional horta made in Greek
villages often uses a mix of wild greens harvested
in the fields, by roadsides or wherever they are
found. Pictured above is another terrific leafy
green we have growing here. It's called
perpetual spinach. I bought it as a seedling
and it just grows and re-grows. We have
harvested leaves from it many times, and it
just grows more leaves in response each time.
One growing tip if you want to try it: it can cope
with a bit of shade, and it hates hot afternoon
sun, so plant it somewhere that fits that bill.

The nice thing about cooking horta is that it's so easy and the amounts are flexible, and the ingredients are basically "whatever leafy greens you have at hand". Though the modern trend with cooking many vegies is to steam them, horta is an old-fashioned method where you boil the greens briefly, then dress them in olive oil and lemon juice, and that's about it. Here's how I did it last night.

We harvested about 500g of leaves, mostly chicory but about
a dozen perpetual spinach tossed in as well. Wash well, drain,
don't worry about cutting off stems unless damaged or brown,
then roughly chop the lot.
Bring a large saucepan of salted water to the boil, then add the
washed and chopped greens. Let them boil gently for 20 minutes.
Drain the cooked greens in a colander.
I'm sure that all the Greek cooks who make
horta just drizzle and squeeze, but as a
beginner I used two tablespoons of extra
virgin olive oil and one tablespoon of
freshly squeezed, home-grown, lemon
juice. Add salt and ground black pepper
to taste and mix it all into the greens.
Horta is rarely served piping hot. It gains flavour when just
warm, and it chills in the fridge and reheats very well, too.
Who says potato salad has to have mayonnaise? Mine included
home-grown shallots (green onions) and finely chopped radish,
but alas the kipfler spuds weren't home-grown.
And this being a Greek dish, we had lamb
(cutlets), flavoured with garlic and home-grown
rosemary and lemon juice.
Our first experiment with horta has changed my mind about what I am growing in our vegie garden. Chicory and perpetual spinach are so easy and prolific to grow, and cooking them is so easy that I think I'll make space for them on a permanent basis from now on, as popping outside to get the greens for dinner is such an easy and pleasurable thing to do.