Sunday, September 27, 2009

Speedy spuds


When they're young, there's nothing more cheerful than potato plants. What a picture of rude green health they are. It was only back on September 8 that I did a blog on bagging up spuds, having planted them just two weeks earlier. And now, on September 27 the spuds have roared away and the tallest plant is 35cm high already. They're all very green, thriving in their planter bags, and ready for a spot of 'hilling'.

Here's the happy crew this morning, spreading green cheer. However, they've grown so fast it's time to do a spot of 'hilling', or at least the bagged potato version.
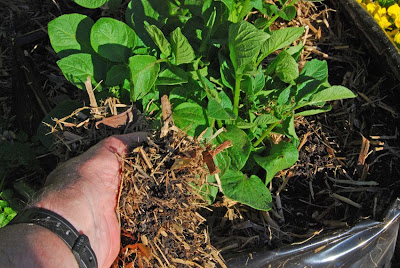
After unrolling the sides of the bag by five or six inches I then filled the bag, and around the plants, with a mix of compost and straw. This 'hilling' is important, as it stops sunlight ever getting onto the crops of potatoes which form around the stems of the plants. Sunlight on spuds will make them green and poisonous, so hilling is an essential part of spud farming.

The mixture is actually compost and sugar cane mulch, the same stuff I use to mulch the garden. I think it's mixed up around 50:50 proportions, but it doesn't really matter. I know I probably don't have enough compost left over to fully fill both potato bags, so I'm using the mulch as an 'extender'. Reading online, I've noticed that some gardeners grow their spuds in nothing but straw and they still get good crops, but I think the richness of the compost surely helps. It certainly seemed to help with last year's potato crop.

This is how the bags look after the hilling. I guess that I'll have to do one more 'top up' of compost and straw in a few more weeks, as there's about six more inches of bag to unfurl.

So far so good with this year's little crop. In fact, this year's spud crop has grown even more vigorously than last year's, but they are different spud varieties I am growing this year, and this might explain the amazing growth. Also, it has been warmer this spring than last year, so that might also have a lot to do with it. Whatever the cause, the ugly black plastic bags full of spud plants are a cheerful, pleasing sight. I'm looking forward to seeing a good array of those pretty, simple white potato flowers next, and at the current rate of growth it might be sooner, rather than later.


Saturday, September 26, 2009

Repotting time


Following our spectacular dust storm on Wednesday, we almost had a replay this morning, with a second, but much milder dusty start to the day today. Fortunately it blew over and away fairly quickly, but the weather here has been windy and quite unpleasant all day, even though it's dry. Not good gardening weather, but reasonable repotting weather.

So I threw a tarpaulin over our timber outdoor entertaining table and presto! Instant repotting zone. My bromeliads have been begging for repotting for weeks now, and so they are first priority, but I noticed that my new native orchid was in a very, very dodgy looking potting mix, too, and a couple of other pots needed new mix. So there was plenty to do in this sheltered spot away from the gusty winds.

No, this person doesn't need repotting, but it is why I am repotting my bromeliads. I want more of this spectacular display. This shot was taken last November, when my variegated Neoregelia bromeliads were making babies. When they blush pink, you know the Barry White soundtrack is playing in the bromeliad garden.

Months later (ie, today), and mum (the red-tinged person on the right) wants her child (the yellow-green variegated large backpacker on the left) to leave!

Bromeliad babies are called pups, and the general rule of thumb seems to be that the pups need to be at least 30% the size of the parent before you cut them off and repot them. As you can see, this big puppy is about the same size as its parent, so it's well overdue for relocation to a new home. Apparently, sociologists say the same story is being repeated in human homes throughout the western world! Adult children still living with mum and dad...

Removed from the pot, you can see how the pup pops out from the base of the parent plant. What I plan to do is simply cut off the pups and repot them, and send the parents off to the green recycling bin, as I don't have space for that many pots. However, I have been told that if you repot the parent plant, it will probably also keep on growing and produce even more pups (although that isn't guaranteed – it's a bit hit and miss, I hear).

I just remove the pup from the parent with an old kitchen knife. Sometimes it goes well like this, and you get a little bunch of roots attached to the pup...

... And other times I stuff up and, while I think I'm making a precision surgical cut, I just end up with a stump like this. Having made this mistake in previous years I have found that both pups grow on nicely, so it doesn't seem to matter all that much. However, I guess a bromeliad expert might have something to offer on this topic, but I'm just a bromeliad newbie who likes them and has discovered that they're almost indestructible!

As for the the potting mix, I use a simple mix of equal parts ordinary potting mix and orchid potting mix. This has worked well for me for several years. I use my trusty purple scoop to measure out equal quanities, then mix together well in my handy trug. (Tip for inner-city gardeners: get a few plastic trugs – think of them as inner-city wheelbarrows.) This produces an ultra-free-draining potting mix, but it also helps to hold the almost rootless pups fairly securely, too.

Traaa daaa, four new bromeliads ready to go. The main thing with repotting pups is to make sure they are upright, not leaning over. My bromeliads live in a fairly shady but well-lit part of the garden, need almost no fertiliser, but they do like to have their central cup, which holds water, to be topped up if it hasn't rained lately. These are incredibly tough plants. The main method of killing them is over-watering, especially in winter. How they feed themselves is by leaf-litter falling and collecting in their water cups. The leaf litter breaks down, becomes plant food, and life goes on. If you like, you can give them very weak liquid feeds (half or quarter strength) once every now and then. However, I don't do this at all and they're healthy and happy, and have been for years.

At the recent Florafest Garden Festival I increased my native orchid collection by one extra plant, but I did spot a bit of pure white polystyrene poking out of the potting mix, and so I decided to investigate what lay inside its pot. Here's the result. El cheapo orchid potting mix, courtesy of chopped up polystyrene and a cheapskate plant breeder. Orchids aren't that fussy about what they grow in, but I just don't like polystyrene!

So, as I had the orchid potting mix out for repotting my broms, I treated the native orchids to a pot-full of real orchid potting mix. This is very, very free-draining, mostly composted bark.

Much better! A proper pot with proper potting mix.

As Pam bought a Lithops (aka living stone) at the garden festival, I was also suspicious about its planting medium, too. This turned out to be pure gravel – 100% tiny rocks, plus a bit of sand. That's probably not too far removed from a lithops' natural habitat, I guess. And at least there wasn't any polystyrene! But I repotted this little fellow into a 50:50 mix of grainy, shop-bought, succulent & cactus potting mix and the original tiny stones. Only time will tell if this works, but the blue-glazed pot is much better than the boring orange plastic original pot!

Friday, September 25, 2009

My kiwi gatekeeper


As Sydney's climate is warmer than New Zealand's, it's no great surprise to find that the popular kiwi plant called 'NZ Christmas Bush' is in flower here already, in spring. It's doing a great job for me in my ugly side passage, where all the various wheelie-style garbage bins and the air-conditioner unit live. From the street, all passers-by see is a tall potted plant with green-blue foliage topped with fuzzy red pom poms. And that was the plan, and each year it's working better than the last.

Here's the top half – the showtime section – of my kiwi gatekeeper this morning. This year's blooming is better than last year's, which was better than the year before, etc, etc.

Standing back at street level looking down the side passage, and the cover-up is complete. Instead of boring bins you see greenery, and beyond the Christmas bush the greenery of the angel wing begonias.

The flowers are little starbursts of hundreds of fine crimson needles, each tipped with a tiny golden bobble.

Though it's covered in flowers there are plenty more to come, just waiting to burst from their little clusters of buds.

Caught in the act, the explosion of each flower is slow-spreading fire. Indeed, several cultivars of this plant, whose name is Metrosideros, have 'fire' in their name (such as 'Fiji Fire').

I've blogged about this lovely plant before, here. It's one worth recommending to people in similar climates for several reasons, apart from its beauty and hardiness. One big positive is that it is doing well in a lousy spot, with just partial morning sun from about 8am, and shade from about midday onwards. I know that these things also do well in full sun and they cope brilliantly with coastal spots full of salty sea spray, although that isn't an issue for me.

Mine is in a pot that has built-in pot feet, and I think good soil drainage is a reason it's happy. I also feed it slow-release plant food, which is ideal for anything in a pot, and I'm a good boy when it comes to watering it, too.
In return, it has never misbehaved, been attacked by pests or looked unwell. My only worry is that someone, a passer-by, will steal it some day. They'll need more than light fingers, though. It now weighs a ton!


Wednesday, September 23, 2009

Life on Mars


Talk about a red sky in the morning. Sydney woke up to what might be its first-ever dust storm this morning. This is how things looked about 15 minutes after sunrise. Instead of the white-yellow glare of a low sun, everything looked deep red, like we were on Mars.

Eeerie is the only word to describe the feeling of waking up with all your windows glowing red. Our breakfast radio announcer ventured 'spooky' as well as 'eerie', and no-one would disagree. And he's playing songs by Dusty Springfield, Slim Dusty, etc. Nice touch!

About five minutes later the light brightened slightly, and this is the scene on the street. The dust has been blown here by fierce, strong winds emanating from the centre of the continent, and the winds here are howling this morning. The weather bureau says to expect gusts of 100km/h (60mph).

Looking the other way down the street and it's just like when it's foggy, except that it's red. The street lamps are glowing, and as cars drive by their headlights send out pinky red beams in advance.

Looking from the back of the garden to the house, and the southern sky, and my lungs are hurting. I suffer from mild asthma, and even five minutes out in that stuff and I'm short of breath. So, for me, it's inside to blog about it all, use the puffer and stay away from the dust. You can taste it in your mouth, and it's unpleasant.

Well, here at the Garden Amateur blog I am sure some readers must get sick of me blathering on about the beautiful Sydney climate, but today it's deadly. Be glad you're not here! Strong winds all day, lung-damaging dust choking everyone, traffic chaos everywhere, and if those gales work up, I am sure some beautiful plants and trees will be blown down. I'm not really sure if this is Sydney's first dust storm, but I've been here 55 years and it's my first one. And that concludes the weather report from Mars, Australia.

Tuesday, September 22, 2009

Better late than never!


In early June I did a little blog entry called 'African babies', about this flower, the Natal paintbrush, or Scadoxus puniceus. Back then I just planted the bulbs, and today I am very thrilled to be able to report that they're almost in full flower, even though they are a bit behind schedule. But before I begin a little rundown on how my South African bulbs turned into yet another Aussie migrant success story, I should once again thank my friend and workmate Geoffrey for giving me the bulbs in the first place.

Here they are this morning, September 22. They were planted back on May 30, a little later than the ideal, says Geoffrey. His own scadoxus bulbs have already flowered a couple of weeks ago, for example, so I am a bit behind schedule just for this year. But as they say in the classics – better late than never.

After being planted on May 30, with their bulbs buried about two-thirds deep, they did nothing at all during June and July, and it was only by mid-August that there was some promising action, as pictured above on August 13.

As Geoffrey predicted, the two larger bulbs will flower this year, while the smaller one (on the right) needs another year before it will do so. This is the scene on September 4.

To be a flowering contender, scadoxus need a flower head, such as this one.

The baby scadoxus is perfectly healthy and in fact was the first of the three to show any signs of growth in early August, but it's just going to be a pleasantly leafy resident here in Amateur Land this summer, as it builds up in size in the kind of fairly well shaded and sheltered spot that scadoxus prefer.

Progress came quickly, and by September 16 the flower heads had started to open and the largest of the plants had reached about 18 inches high.

Peering inside the flower heads, you can see there's an enormous throng of buds waiting to burst free from their confines.

Here they are this morning, September 22, in bloom. The red petals at the outside of the flower should open out a bit further over the next few days, but this is close enough to 'full bloom' for me.

My favourite time of day to enjoy this fascinating bloom is late afternoon, when the low sun kisses the golden tips, setting them aglow, creating Mother Nature's own Olympic torch.

What a spectacular way for a flower to make its entrance in a garden! Geoffrey's kind gift is a welcome addition for sure, hopefully its memorable debut is the start to a long and glorious career here.


Monday, September 21, 2009

The BBY staff bakeoff


Well, that was fun! The Burke's Backyard magazine inaugural staff bakeoff was a wonderful success, hopefully the start of an annual tradition. As I mentioned in an earlier posting, we pinched the idea from here.

But let's get down to the judging, the winners, the runners up – and the scandals behind the scenes!

The great thing about our little bakeoff was the variety on show. We're a pretty small team, but no two people made the same thing, and the sheer range of creations made for an excellent feast. There were two sections for judging – sweet and savoury, and naturally enough the sweet section was where the competition was hot.

The expert judge for the bakeoff was our very own cookery editor, Tracy Rutherford. As our magazine's leading cook, Tracy had to be nobbled from the competition right from the start, so we made her the judge. She did a superb job, and came up with two excellent winners, with creativity being the 'X-factor' that provided the decisive difference each time.

The overall winner was created (and styled) by our stylist, Sandy de Beyer. Home-made brandy snap baskets filled with sour cream, gingered figs and orange. Yum! Everyone agreed Sandy's creation was a deserving winner, but the whole day was a winner, too, so here's a few more pix to tell the whole story.

These entrants are meant to be nervous, yet they're smiling! They know that in 15 minutes they're going to be able to stuff themselves silly with this table-full of treats.

The savoury section consisted of two entries: my spinach pies and Christine's tomato and feta slices.

And Chris's truly yummy slices took out the prize in that hot little competition. Chris included slowly oven-roasted tomatoes in her topping, and that intense, tomatoey flavour was the winner for me. Such a nice idea for finger food. So good I'm going to pinch it!

As mentioned earlier, the sweet section was where the main action was.

Geoffrey's rice puddings were creamy heaven, Julie's raspberry muffins were a delight, my honey pie wasn't a disaster (but looked about as interesting as a spare tyre), and our photographer Brent's key lime muffins won the unofficial prize (ie, he didn't get anything) for effort put into presentation.

And here are Brent's key lime muffins in close-up. (Credit: styling by Brent Wilson, my pic tho.)

Kim's chocolate pavlova was the attention-getter when you first walked into the room. Wow!

Sandy's winning entry deserves a repeat. It tasted as nice as it looked, too.

Geoffrey's rice puddings and Victoria's choc chip cookies belonged in a shop window, but they're home-made! Nice use of striped tea towels in the presentation, Geoffrey.

Lesley's pecan pie would have won the neatness award, had we had one. Perfect symmetry all round, heavenly sweetness inside.

And after the judging the plague of locusts swarmed, and little was left by the end of it all, which is how all staff bakeoffs should end.

And now for the scandal, or at least an attempt to beat up a scandal out of thin air...
As I was taking this photo of the bakeoff winner Sandy (right) having a cosy chat with our bakeoff judge, Tracy, after the bakeoff judging, I thought a good caption would be to pretend that this was Sandy bribing Tracy half an hour before the bakeoff judging.

But when they heard about my plot they had a better idea. Instead of my sleazy innuendo, how about getting "the money shot", catching them red-handed with Sandy handing the money to Tracy? Bribery scandal! Halt the presses. Call in the stewards. We want a replay!

And a replay there will be. Same time next year. The big bakeoff. A tradition begins. So, go on blog readers – organise one at your workplace!