Showing posts with label cooking. Show all posts

Sunday, June 17, 2018

The 10-Year Rewind – Part 16 – Chermoula


Every day this month I am looking back on the 10 years since I started this blog in June, 2008. Part 16 is this one — Chermoula — from May 2010. Over the years I've done occasional cookery postings, and this is one dish I still love to make from scratch, starting the time-honoured way with a mortar and pestle.


With more than a week of relentlessly wet weather drenching the garden and ruining that kind of fun, there is but one thing for this boy to do – cook! But something new, something different. For our 20th wedding anniversary last year, Pammy bought me a lovely Scanpan Tagine plus a big, beautiful Moroccan cookbook, and that's where I went to for inspiration. Hmmm, "chermoula" – a classic North African spice/herb blend – that sounds nice. I have most of the ingredients either in the pantry or growing in the garden. Let's go.

I'll give the recipe at the end, but here it is in its prettiest stage, just after I added ground cumin, paprika and cayenne pepper to the garlic. But I am already getting ahead of myself.

Here's the makings of my chermoula. Coriander, parsley and lemon (all home-grown), garlic, paprika, cumin, cayenne pepper, olive oil, and mortar and pestle.

Oops, forgot to mention the salt. In fact the salt is a magic ingredient, as it helps to turn garlic to soft mush with just a few thumps of the pestle. It's just like a little chemistry lesson on its own, the way salt disintegrates garlic.

Then you add the three spices mentioned earlier.

Then add chopped parsley and chopped coriander, plus some lemon juice, then at the end, some olive oil.

Traaa daaaa! Chermoula. It wasn't that hard to do, but the trick is to not add all the bulky parsley and coriander in one go. I added it in small batches and it quickly pounded down. Total time taken to pound it all down to a paste was about 5 minutes. Good village-style peasant work, and good rainy-day work, too. I suppose you could do it all in a blender, but it wouldn't come out like this, with the little chunky bits here and there.

The next step is to coat the "meat" with some of the chermoula. This in fact is a beautiful fish called Bass Grouper (it's similar to blue-eye cod). It comes as big, thick steaks from which I remove the bones, then cut it into chunks. It holds together beautifully in cooking and remains moist, never seems to go dry. However, this recipe would work equally well with other meats, such as chunks of chicken or pork, for example.

Next, the vegies. Here, I cut up slices of potato, red and yellow capsicum, zucchini, and tipped in a can of diced tomatoes, then stirred in the remainder of the chermoula and a few leftover scraps of parsley and coriander.

Big spoon to toss all the vegies together, plus a grind each of salt and pepper, and a drizzle of olive oil.

Any casserole dish will do, of course, but I do think my tagine looks snazzy.

Into the tagine I scooped in half the vegies to layer the bottom, then covered these with all the fish (which had been marinating in the chermoula for the half-hour it took to prepare all the vegies), then I covered the fish with the rest of the vegies. Lid on. Bake one hour at 180°C (350°F) and it's ready. Serve with couscous on the side.

Halfway through eating it, I said to Pam: "Oh oh, I forgot to take a photo of the finished dish". So you'll just have to imagine the results. It tasted yummy, though. Anyway, here's the amounts for the chermoula. As for the vegies, I just made all that bit up as I went along.

Chermoula
2 garlic cloves, roughly chopped
1/2 teaspoon salt
3 tablespoons chopped flat-leaf parsley
3 tablespoons chopped coriander (cilantro)
2 teaspoons paprika
2 teaspoons ground cumin
1/2 teaspoon cayenne pepper
1 tablespoon lemon juice
2 tablespoons olive oil

Method: pound the garlic with the salt until mushy, then add the paprika, cumin, cayenne pepper and lemon juice to make a paste. Then add the parsley and coriander in batches, and pound until reduced in bulk. Finally, work the olive oil into the mixture in stages, until blended nicely.

(For Aussie readers, this recipe is from the excellent book, "The Food of Morocco" by Tess Malloss, published by Murdoch Books, ISBN 9781741960341).


Sunday, May 24, 2015

Hamburg parsley


With today's harvest of Hamburg parsley I can say that a several-month-long experiment has produced a grand total of three edible plants. 

Anyone who has grown parsley has probably noticed that when it's time to yank the finished plants out of the ground and replace them, they come out with a small parsnip-like, deep root. Well, Hamburg parsley is a special variety of parsley which has been bred to produce a much larger root. The top of the plant looks just like ordinary parsley, and indeed I have harvested its leaves for cooking several times, and I can find no difference between the flavour of ordinary flat-leaf continental parsley and Hamburg parsley.


Here's the crop in all its dirt-covered glory. They are the same size as parsnips, and one is a bit crooked and lumpy, the other two are much more presentable.


Scrubbed clean they don't really look that attractive, but even as I scrubbed them clean they gave off a parsley-like scent.


The seed packet label says you can use this as a root vegetable (roasted, added to soups etc), as a salad vegie (grated) and in stir-fries (finely sliced or julienned). 


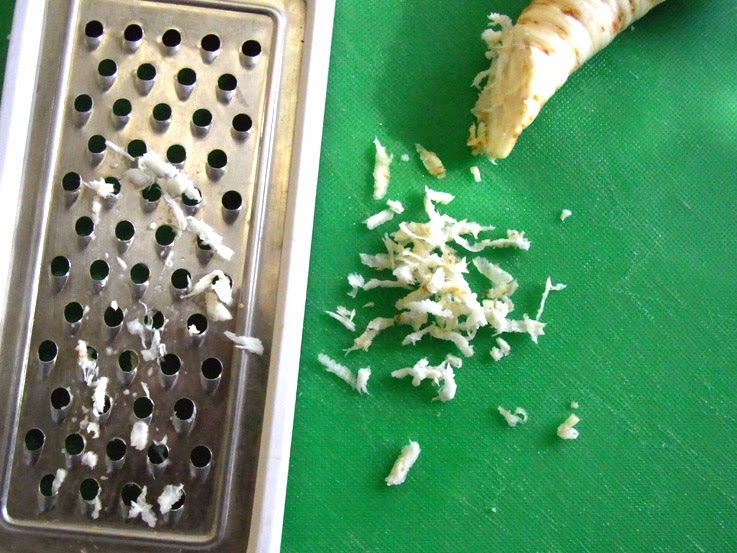
Grating was the easiest first test, and so I brought in the finest palate in the house, Pammy, for her opinion. She says it tasted a bit like very mild horseradish, but nowhere near as hot. I could definitely taste the parsnip resemblance, but she's right about there being a very gentle spiciness there as well when it's just raw and grated. 

So the next test took a while, as I baked the smallest one in the oven (at 180°C) for one hour. And the verdict is ... think "parsnip" but not quite the same. And like older parsnips, this one was a bit woody in the centre, so I have probably left these in the ground too long. Should have harvested them a month or two ago.


Here's the seed packet, with a photo of an award-winning crop of impossibly large and perfect Hamburg parsley roots on the cover, to make you feel just a bit optimistic in the beginning, and a bit deflated six months later (just kidding, I am a proud parent of my slightly misshapen little crop).


And here's the flip-side of the packet. Growing this type of parsley is much the same thing as normal parsley. It grows best from seed, the seeds can take 3 to 4 weeks to come up, and the plants do well in either full sun or semi-shade. They love being watered regularly and well-fed. 

Sow the seeds shallowly (less than 1/2 inch deep), sprinkle them in, cover with soil, water well... then wait, and wait and wait. Keep watering! And one day they will come up when they're good and ready.

The advantage of this type of parsley is simply that you get a bonus crop at the end, and of course it's a bit of an oddball as well. It's basically the same stuff as parsley in the garden, so you can harvest its leaves for cooking as much as you like. The other good thing about it is that it's a good choice for people whose gardens lack a full day of sunshine (and that's a common inner-city gardening problem).

My seed packet's use-by date is August 2015, so it's now or never. It says sow "spring through to autumn" and Sydney has a mild autumn and winter anyway, so I just sowed my second crop this morning. Wish me luck!


Saturday, June 9, 2012

Impulse baking


You've heard of impulse shopping? Sure you have, you've probably been a victim of it numerous times. It's a modern affliction that probably keeps the retail part of our economy rolling along, the truth be told. Well, there's a little-known sub-category of impulse shopping called 'impulse baking', and that's what I'm doing this lovely, sunny afternoon. 

You see, I've been meaning to bake some bread for some time now. And then this morning in the supermarket, I found myself in the aisle where all the flours are sold. I spotted this packet containing a Soy and Linseed bread-making kit ("everything you need, including the yeast") and so impulse baking claimed another victim.

Now, first things first, for successful impulse baking you need to be
• Poorly prepared
• Ill equipped
• Enthusiastic and optimistic.

Check, check, check and check, let's go.

These aren't bread tins, but they're the closest I have. The
bread-making kit is from my local Woolies supermarket.

Inside the kit I found four 600g bags of flour mix
plus one sachet of yeast. The flour mix has the seeds,
salt and other goodies already added.
You add two teaspoons of the dried yeast to the
flour in the bowl, mix to combine.
Then add 390ml of lukewarm water to
the bowl, mix well. This forms a sticky, 

gloopy mass like you wouldn't believe! Help!
(what have I got myself into?)
After successfully extracting the gloop from the bowl 
came the hard part: kneading the mass by hand for a full
10 minutes on a lightly floured board. This isn't
the 'fun' bit but it's essential. However, as someone
who happily uses a mortar and pestle to make spice
mixes, kneading bread is the kind of peasant
village stuff that comes naturally to me.


Put the dough in a bowl, cover with a clean tea towel,
put in a warm spot and and leave the dough to rise for
40-50 minutes. This is the boring bit, so it's time for
an intermission, folks. What did I do in that 50 minutes
while I waited for the yeast to do its thing? I read a book.


This book, given to me by Pam as a present a few years
ago. It's called 'Plates and Dishes', and while it does
have words in it, it's the photos which captivate. 
There's spread after spread with the meals the author ate
an each roadside diner on the left, and on the right
page a portrait of the waitress who served him.
The food isn't great but the people photography is.
As I haven't obtained persmission to show you the book,
the least I can do is provide a linky to its listing on
Amazon, if you're interested. http://tinyurl.com/6wju25g
And so while we wait for the bread to rise, here's a few
lovely American Diner Gals and the food they serve.


What a great book, how time flies with a lovely book...
Oh, goody, the 50 minutes' waiting is over and the bread has doubled in size. 

It's time to 'punch down' the dough to remove the build-up
of gas caused by the yeast, and to gently knead it for
a bit more (not the 10 minutes like the first time).
The next step is to put the dough into a lightly oiled
bread baking tin, cover it with the tea towel again,
then wait another 40-50 minutes until it doubles in
size again (while it's sitting in a warm spot).


After another 50-minute wait it has grown in size a 
fair bit (not sure if it has doubled in size, but it is a 
lot bigger), so into the preheated 220°C (fan-forced 
200°C) oven it goes, for 25-30 minutes. 

After 30 minutes it looked like this, which is good 
enough for me. Lovely! While it baked the smell was
so good that I immediately thought I should put up
a 'For Sale' sign on the house and sell it that
afternoon, at an inflated price (well, you know that
old real estate agents' saying that the smell of
baking bread helps sell houses) but then again it
did occur to me that Pammy might not feel quite
the same olfactory impulse, so I parked that idea.

All the books say if you tap the underside of the loaf 
and it sounds 'hollow', it's done. Tap tap – mine sounded
hollow enough. Then you have to let it cool down 
completely on a wire rack before slicing it.


Traaa daaa! Not too bad. Tasted nice. Not exactly
light and fluffy in texture, but for a beginner's first 
attempt I'm giving myself 5 out of 10 – a pass mark 
with plenty of room for improvement!


Now I've finally dived into bread baking and have come up with a reasonable result, I'm going to keep at it. There are three more 600g packs of soy and linseed flour in that packet for starters, so hopefully the next time I'll get up to a score of 6 out of 10. Tomorrow morning I plan to cut four slices from this loaf, toast them, then top them with poached eggs for Pammy and me.

The world is my bakery after that. Baguettes, olive bread, herb bread, bruschetta on ciabatta... oh let's not get too carried away now!

But it is an inspiring thing to do, making one of the staples of life which humankind has been baking for thousands of years. I think I could easily do a bit more bread-baking from now on. Smells nice, tastes nice too.


Saturday, April 28, 2012

Ruby red quinces


Woo hoo, it's autumn and quinces are back in season, and as I have guests coming around for lunch tomorrow, I thought I'd make the dessert today. And thanks to a great recipe by Brigitte Hafner which I found at the Melbourne Age's Website, I now have some truly ruby-red quinces ready as part A of the dessert. Here's how it all went. 

Let's start with the glowing rubies in their pot, after
five hours slowly changing colour in the oven. 

But I am way, way ahead of myself, and so let's go back to the beginning... 

Shop-bought quinces, all covered in
a dust-coloured down, called a
'bloom'. Sydney's climate is a bit too
warm for happy quince growing, and
so I am perfectly happy to just wait
patiently until autumn comes around
each year, and enjoy the three to
five months they are available
in our local fruit shops.
If only they could invent a 'scratch and sniff' widget
for bloggers, as this spiced sugar syrup smelled
divine as it bubbled away. Like wandering through
a spice market in some faraway place. There's orange
peel, cinnamon sticks, whole cloves, vanilla beans
and star anise, as well as roughly equal amounts of
water and caster sugar.
Peeling and coring quinces is the boring bit, and it
does take time. These things are not smooth and
compliant like apples, but I find that a vegie knife
is a perfectly good peeler (it's quick, even if it does
slice off more flesh than a proper peeler). And the
cores can be quite firm, woody and tough, depending
on where you cut and the fruit itself. Make life easy
for yourself and buy biggish quinces, accept a bit of
wastage and trimming them isn't such a chore. And
don't discard the peels or cores, either (see below). 
Once peeled, quinces go brown faster than you can
say "Yikes, they're brown" so don't worry too much,
they all go very red in the end. Next step is to put
all the quinces into a big baking dish or big pot, and
cover them with the strained spiced sugar syrup.
Next step is to cover the quinces with a layer of muslin.
Now, a word of warning for newbies with muslin...
My friendly local dress fabrics shop told me to wash
then boil the muslin in water for a few minutes prior to
using it. This takes care of any unwanted particles
hanging around after the manufacturing process. Well,
that's what he said and so I believe him. Where were we?
That's right, cover the quinces with a layer of muslin.
Remember all the peels and cores we retained? These
go over the muslin in a thick jumble layer.
The recipe says then add a layer of baking paper.
Gosh she's keen, but I am a recipe-follower by nature,
so a layer of baking paper it is. But wait....
Then a layer of foil, tucked in at the edges. None of
that syrup moisture is going to escape from this baby.
For the complete overkill, the cast iron pot's lid goes
on top, and into a 160°C oven for five hours. A truly
wonderful aroma, spicy yet sweet, filled the house
this morning (did I tell you I like to cook in the
mornings? I started at 8 – morning all!)
And five fragrant hours later we're back at the hero
shot of the delicious sweet rubies of flavour, ready for
tomorrow's little gathering.

Now, I will cheerfully admit to a certain amount of cowardice about the rest of this dessert, which I won't be blogging about just quite yet.

Lunch's main course is going to be a Moroccan lamb and vegetable tagine, with a spiced cooked carrot salad, saffron rice (instead of the ubiquitous couscous) and a green leaf garden salad on the side.

Dessert might just be baked quinces with honeyed yoghurt if the other part of the dessert goes badly. This is because I am also attempting to cook at Lemon Yoghurt Syrup Cake. Now, I am not a cake-baker at all, but I thought I'd give it a go. We'll know how it turns out when the cake cools down fully, later today, and I attempt to get it out of the tin. If it is a complete disaster, then it's quinces and yoghurt, folks. If it's a success then it's a light cake, spiced quinces and yoghurt (I'm sure none of my friends read my blog, of course). Wish me luck and I'll let you know how it all went, next time round.

Tuesday, September 27, 2011

Condo condo condo


We're both really glad we made the decision to slow down for a few days. The constant cycle of packing, driving, checking in, unpacking, then repacking and doing it all again a day or two later becomes a bit of a chore, and so we're spending four whole days here in lovely Santa Fe. And instead of staying in a hotel, we found a reasonably priced, fully furnished condo to stay in not far from the centre of town.

This is the adobe-stye exterior (virtually everything in Santa Fe is adobe style; I've never seen such a dominant architectural style in the one place). Our condo is a one-bedroom spot, but this complex has two- and three-bedroom condos available too. It's called Fort Marcy, and you can check it out at its website, here.

For me, the absolute lap of luxury is a separate living room. I often wake up earlier than Pam, and here I can wake up whenever I feel like it, sneak into the next room, on with the lights and keep on reading the book I am currently enjoying very much ('Travels with Herodotus' by Polish writer Ryszard Kapuscinski). The cute cactus in the corner is carved from wood, and the cabinet contains the TV and audio gear.

I love this old cabinet with its ornately decorative punched metal panels. I'm not sure whether this is a classy reproduction or just a nice old piece, but it feels like its a charming old New Mexican piece to me, as they usually don't bother with making worn looking dovetail joints in the repros.

The bedroom is comfy and the place itself is extremely quiet; can't hear a peep from any of the neighbours.

The bathroom is a colourful New Mexican classic.

I love the handbasin.

The kitchen has a stove, dishwasher and a full set of pots and pans, etc. One of the things which I know I am going to miss the most on this long drive across the country is cooking. I just love to cook, it always soothes my spirit (as I discovered many years ago on my last long holiday: back then, I felt strangely unhappy and unsettled after a month or two on the road, and it was only when I started renting self-contained units and started cooking for myself that I actually started to feel happier and enjoy that long holiday back in the 1980s). So last night, as we were both fairly tired after an afternoon being tourists in sunny Santa Fe, instead of going out again, I did some cooking, baking some chicken marylands (with lemon and thyme) plus lots and lots of vegetables, to make up for the relative lack of vegies in the restaurant offerings we've been eating these first two weeks on the road. Pammy loves her vegies, but she demolishes chicken portions, too!

Another blessing of the kitchen is that it allows us to boil some water and make some good, strong coffee using the coffee plunger loaned to us by a good friend (thank you Jolanda!). Contrary to all the stories told to me before our departure, the coffee served at restaurants and hotels hasn't been terrible. It is merely a bit weak for Aussie tastes accustomed to Italian baristas in Sydney's inner city suburbs. The coffee here is about the strength and flavour of any ordinary instant coffee. Not great, not terrible either. In most hotel rooms they have little drip-filter coffee machines, and they produce that drab but OK instant coffee standard drink. What we quickly learned to avoid was the 'creamer' powdered milk which is all that's offered in hotel rooms. So we've been buying small cartons of real milk and taking them up to our rooms.

However, the other big motivator for staying here in Santa Fe for a few days is to let Pammy do some painting. The 'on-the-road' lifestyle isn't exactly conducive to whipping out the paper and brushes at a roadside stop, and so each morning of our four-day stay Pammy is sitting in a corner lit by the morning sun and working away at her art, serenaded by the folky and sometimes Mexican-flavoured tunes played by the very good local radio station.

In the afternoons we head out to do some shopping, but here in Santa Fe there is so much art to take in that we'd need to stay another week to see it all. Along the main strip of art galleries, Canyon Road, there are no less than 130 commercial art galleries. And then there are the major institutional galleries of New Mexican Art, of Folk Art, of Indigenous Native American Art, and of the work of Santa Fe's most famous artist, Georgia O'Keefe. I'll save up the travelogue of Santa Fe art and architecture for tomorrow though.

The weather? Fine, sunny and in the high 70s and low 80s (25-30°C). The skies here are that same clear, vivid blue you see in Australia. No wonder this place attracts so many artists. It's a beautiful place to be, the light is inspiring.

In a few days we have some long drives ahead of us, down through Texas, but in the meantime we're recharging our batteries here in our cosy little adobe condo.