Sunday, April 29, 2012

I let them eat cake


Yesterday I was filled with trepidation about my very rare venture into cake-baking. And there's a simple reason for that. I didn't exactly follow the recipe (which I will give at the end of this posting). It was around step three that I went off the rails. This was the bit where you 'gently fold in' the lemon zest and the flour and the yoghurt. I was having so much fun with the electric egg-beaters that everything added got a thoroughly good whizzing with the Sunbeam Egg-o-Blaster (or whatever it's called), and so when I saw the 'gently fold in' bit, I recalled at that fateful moment that he or she who overbeats the batter gets all they deserve. Oh dear, such is the life of a baking newbie. Anyway, here's what happened next...

After 30 minutes it was looking alarmingly brown on
top, and as a skewer came out clean, that was good
enough for me. Notice that gentle dimpling in the
centre? (Stop sniggering, cake experts.) That developed
into a more serious looking sink-hole as it cooled
overnight. This is a 'Syrup cake' by the way, and so
 I liberally splashed on most, but not all of, the lemon
flavoured sugar syrup, as the recipe says. 
I almost forgot to take a photo at this stage, such was
the panic about plating this up with the quinces and
the yoghurt, but here's how it looked. Notice the sinkhole?
It was moist but not fabulously moist, so I should have
added all that syrup, after all. However, it was a
moist cake, and lemony, and I am determined to make
it the right way next time round. Even with a newbie
in charge of the egg beaters, it worked out quite well.
Forgive my lack of food styling skills, but here is the
cake, with the baked quinces (from yesterday's blog)
on the side. Fortunately, the quinces were so very
fragrant and delicious that all the cake's shortcomings
were forgotten at first bite. So I just barely survived my
rare foray into cake-baking by having something
much better on the plate which served as a distraction.
Sorry about this photo, too, but I only
remembered to take a photo a bit late
in the piece. I am almost as happy with
this Greek yoghurt and honey as I was
with the quinces (notice how I've forgotten
about the cake already?). To make this
I lined an ordinary plastic kitchen strainer
with muslin, tipped in a 500g tub of
thick Greek yoghurt, set this over a bowl
and left it in the fridge overnight to drip,
drip drip away. It leaked about a cup
of liquid, and the resulting very very
firm, thick yoghurt looked superb.
God bless Olga and Tina at Danas
Cafe and Deli on Illawarra Road,
Marrickville, as they stock all sorts of
very authentic Greek ingredients, such
as this Greek Thyme honey. Words
other than 'try it' fail me in doing
this fragrant honey justice. With the
yoghurt, all you need to do is drizzle
the honey all over the top of the white
yoghurt dome. Don't bother mixing it
in. It looks lovely with golden rivers
running down its sides.
I won't go into all the details of how the whole lunch
went, but every time Pam and I get together with
Rema, Ravi, Eric and Jane there's lots of laughter
and time flies by so quickly. And the tagine was nice,
so too all the side dishes, and the quinces, yoghurt and
honey, plus the cake, finished things off sweetly.
I particularly like the way Pammy can
always find something in flower in the
garden to dress a table.
Two other foodie highlights that worked well today.
For our green garden salad I scattered pomegranate
arils liberally all over the top, just before serving.
They looked so pretty and when I bought out this bowl
of 'leftover' arils not used in the salad, people started
scooping up more to scatter on their salad. A hit!
Another minor hit was my spicy flatbread crisps.
As the main course was a Moroccan lamb tagine, for
the pre-lunch dips (hommos and baba ghannouj), as
well as using normal Lebanese flatbread, I set aside
 a few to be turned into crisps. After cutting into
triangles, I sprayed each with light olive oil then
scattered them lightly with Moroccan spice mix.
Bake for just 5 minutes at 180°C and they not only
came out crisp but stayed that way all day.
Overlooking all the fun was our little
Backyard Supervisor, White Rabbit. She
says: "Cake recipe, Jamie!"

Yoghurt Lemon Syrup Cake
This is from Pam's vast folder full of recipes. I know she clipped it out of the Herald's 'Good Weekend' magazine, but it might be from 2012 or 2001, for all I know.


125g butter, softened
200g (1 cup) caster sugar
3 eggs
zest of 1/2 lemon
200g (1 1/2 cups) self-raising flour
200g (3/4 cup) natural yoghurt


Syrup
juice of 1/2 lemon
1/3 cup water
150g (3/4 cup) caster sugar


20cm cake tin


Preheat the oven to 180°C.
Cream the butter and caster sugar until pale and light. Beat in the eggs, one at a time.
Gently fold in the lemon zest and flour, then the yoghurt.
Use a spatula to scrape into a lined 20cm cake tin, making the centre a little lower than the edges,
Bake for 30-40 minutes or until a skewer inserted in the centre comes out clean.


To make the syrup, heat the water, sugar and lemon juice in a small saucepan and simmer for five minutes.


When the cake is cooked, leave it in the tin, poke a fine skewer all over the top (about 30 times should do it and spoon the hot lemon syrup over, trying to give the cake an even coverage of syrup.


Allow the cake to cool in the tin, before serving.


Saturday, April 28, 2012

Ruby red quinces


Woo hoo, it's autumn and quinces are back in season, and as I have guests coming around for lunch tomorrow, I thought I'd make the dessert today. And thanks to a great recipe by Brigitte Hafner which I found at the Melbourne Age's Website, I now have some truly ruby-red quinces ready as part A of the dessert. Here's how it all went. 

Let's start with the glowing rubies in their pot, after
five hours slowly changing colour in the oven. 

But I am way, way ahead of myself, and so let's go back to the beginning... 

Shop-bought quinces, all covered in
a dust-coloured down, called a
'bloom'. Sydney's climate is a bit too
warm for happy quince growing, and
so I am perfectly happy to just wait
patiently until autumn comes around
each year, and enjoy the three to
five months they are available
in our local fruit shops.
If only they could invent a 'scratch and sniff' widget
for bloggers, as this spiced sugar syrup smelled
divine as it bubbled away. Like wandering through
a spice market in some faraway place. There's orange
peel, cinnamon sticks, whole cloves, vanilla beans
and star anise, as well as roughly equal amounts of
water and caster sugar.
Peeling and coring quinces is the boring bit, and it
does take time. These things are not smooth and
compliant like apples, but I find that a vegie knife
is a perfectly good peeler (it's quick, even if it does
slice off more flesh than a proper peeler). And the
cores can be quite firm, woody and tough, depending
on where you cut and the fruit itself. Make life easy
for yourself and buy biggish quinces, accept a bit of
wastage and trimming them isn't such a chore. And
don't discard the peels or cores, either (see below). 
Once peeled, quinces go brown faster than you can
say "Yikes, they're brown" so don't worry too much,
they all go very red in the end. Next step is to put
all the quinces into a big baking dish or big pot, and
cover them with the strained spiced sugar syrup.
Next step is to cover the quinces with a layer of muslin.
Now, a word of warning for newbies with muslin...
My friendly local dress fabrics shop told me to wash
then boil the muslin in water for a few minutes prior to
using it. This takes care of any unwanted particles
hanging around after the manufacturing process. Well,
that's what he said and so I believe him. Where were we?
That's right, cover the quinces with a layer of muslin.
Remember all the peels and cores we retained? These
go over the muslin in a thick jumble layer.
The recipe says then add a layer of baking paper.
Gosh she's keen, but I am a recipe-follower by nature,
so a layer of baking paper it is. But wait....
Then a layer of foil, tucked in at the edges. None of
that syrup moisture is going to escape from this baby.
For the complete overkill, the cast iron pot's lid goes
on top, and into a 160°C oven for five hours. A truly
wonderful aroma, spicy yet sweet, filled the house
this morning (did I tell you I like to cook in the
mornings? I started at 8 – morning all!)
And five fragrant hours later we're back at the hero
shot of the delicious sweet rubies of flavour, ready for
tomorrow's little gathering.

Now, I will cheerfully admit to a certain amount of cowardice about the rest of this dessert, which I won't be blogging about just quite yet.

Lunch's main course is going to be a Moroccan lamb and vegetable tagine, with a spiced cooked carrot salad, saffron rice (instead of the ubiquitous couscous) and a green leaf garden salad on the side.

Dessert might just be baked quinces with honeyed yoghurt if the other part of the dessert goes badly. This is because I am also attempting to cook at Lemon Yoghurt Syrup Cake. Now, I am not a cake-baker at all, but I thought I'd give it a go. We'll know how it turns out when the cake cools down fully, later today, and I attempt to get it out of the tin. If it is a complete disaster, then it's quinces and yoghurt, folks. If it's a success then it's a light cake, spiced quinces and yoghurt (I'm sure none of my friends read my blog, of course). Wish me luck and I'll let you know how it all went, next time round.

Sunday, April 22, 2012

Hanging around in autumn


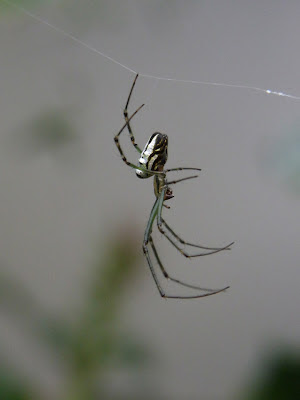
Spoiler warning! Here's a friendly "shoo" for all those arachno-phobes out there. Do not proceed any further, spider photos below. OK, all the wobbly ones gone? Let us proceed.

I don't actually know much at all about spiders, except that my garden is a welcome haven for them, and autumn is peak season for them around here, and so I thought I'd show you three photos I took this morning.

The one thing I do know about spiders and gardens is that a garden with lots of spiders is probably a relatively healthy, organic, pesticide-free place, and so I see my spidery residents as good feedback for gardening the organic way. 


I don't have a clue about correct spider names or
anything, but this is Compost Guy/Gal. He/she hangs out
above our compost bin and presumably does a roaring
trade in the tiny insects attracted to the delicious 
aromas emanating from the compost bin.

Again, no clue as to its name, but as my garden
is forever leafy, there's never any shortage of building
materials for leaf-curling spiders.


This beautifully hairy brown spider currently has a
magnificent three-feet-wide web strung up between the
frangipani tree and a murraya hedge. Being biggish and
out on a wide web in broad daylight is a risky strategy 
(birds might see that fat little spider as a lunch snack) so this
person dashes out when a foolish fly/gnat or whatever gets
stuck in the sticky stuff, wraps it up neatly and quickly, then 
scuttles back to the fragrant comfort of its frangipani hidey hole.


I don't really know if there is any great purpose to this posting, other than to encourage you to love all the creatures in your garden. The more there are, even the scary ones, the healthier your garden must be, and the closer to nature you get every time you wander outside.


Sunday, April 15, 2012

Some (slow) progress


The guy I work for, Don, has a great garden design method that is known as 'put and look'. It's simple enough: just put the potted plants (still in their pots) where you plan to have them, then stand back and see how they look. If you don't like that look, move them around until you do. That's usually a doddle to do with seedlings, baby shrubs and saplings, but with a 10-year-old, 2m tall curry tree in a large, heavy pot it was strenuous going. Enough complaining, here's how 'put and look' worked out.

The curry tree used to be on the 'far right' of this photo,
just behind the money tree (ie, a crassula) on the right.
Before moving the curry tree I had to lean it on its 
side and use tree loppers to cut through the thick roots 
which had grown through the bottom of the pot and 
no doubt were halfway down to China. Rolling it 
around to its new spot took a while, too, but it's 
good morning work, curry-tree-rolling!

No doubt the curry tree will settle into the soil, develop
a lean and need propping up, but it already looks bigger
and happier in this more open spot. As I have cruelly
cut off its tap root it will no doubt lose some leaves and
sulk a bit, but I am hoping that the magic of seaweed 
solution (Seasol) treatments plus the mildness of our winter
will encourage the roots to grow again. We shall see.

The money tree is staying where it is. For a while I 
entertained the foolish idea of moving it, but it's staying
where it is, and the curry tree is to move up the lane.

I showed the full story of this gardening crime last
posting. This was once a potted plant but its roots found 
their way into the soil, the plastic pot burst long ago and
this had grown into a beast with an anaconda-thickness
trunk. Somehow I think moving it might be somewhere 
between impossible and fatal, probably both. So ugly as it
is, but with a story to tell, here it resides.

In between the curry tree and the money tree is this
person, Crassula argentea 'Coral', a charming weirdo 
for whom I have quite a soft spot. Love the chunky trunk,
and the oddball foliage. I think I will plant this one into
the ground, but at the moment it's staying in its pot until the 
'put and look' decision is finally made (ie, Pammy likes it too).

Here's a close-up of its foliage, which is, depending on
which leaf you examine, either hollow at the end or 
deeply dimpled. This isn't a photo taken today, by the way. 
It's one taken back in 2008, when this was a far 
healthier, happier and sunnier personality.

Here's the 2008 plant. Compare this dense foliage on 
this far younger tree with the relatively sparse 
coverage on today's tree, two photos above. I am sure this
is purely due to a lack of sunlight, as the rescued plant has
been heavily shaded by both the grevillea and the rosemary 
which have now both gone to that great compost heap in the sky.

So this is the humble site of stage 2 of the makeover 
(stage 1 was clearing out all the unwanted stuff and having 
it carted away). I still want this to be a succulent bed, 
but not with everything in a difficult-to-manage jumble of
pots. At this stage I'm thinking of laying two courses 
of bricks around the bed, and filling this with a 50:50 mix
of sand and soil mix, so it's very free-draining, the kind
of soil that succulents love.

Here's the old 'succulent city' back in 2008, and 
a happy jumble of plants it was, too, and I would like
to maintain something of the colour and spirit of 
this potted gaggle, but without the pots.