If you are wondering "what on Earth is Jamie on about now?" then you haven't read my previous blog posting, Halloween Conversion, which tells the story of why Pammy and I are now celebrating Halloween in our own little way. It has a lot to do with happy memories of an incredible journey together for us of course, but we now 'get' Halloween, having seen it done so wonderfully well in the US last year.
Nevertheless, the story picks up at Woolies supermarket, where they're selling genuine Jack-o-Lantern easy-carve pumpkins this year, and this candidate for brain surgery cost me just $8.
 |
| The perfect carving pumpkin, thinnish skinned, semi-hollow inside, shaped like a head, the famous Jack-O-Lantern pumpkin. |
 |
| Like brain surgery, pumpkin carving can get messy, so I laid out the Saturday Business Section of the Herald – finally I have found a use for the Business pages! |
 |
| After the boning knife makes a small cut, in goes the saw, to make a big enough lid for my hand to fit into the pumpkin, for scooping out all the seeds, innards and brains. |
 |
| Here's a handy tip: cut the lid with the saw blade at an angle, not straight up and down, so there's no risk of the lid falling into the middle of the pumpkin itself. |
 |
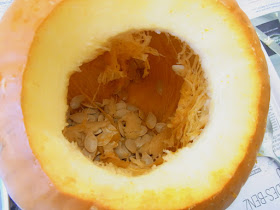
| Inside the Jack-O-Lantern is a pitiful sight, mostly seeds and stringy fibres and nothing much else. A bit icky, in fact. |
 |
| This is what I call the 'batterie de scoop', for scooping out the seeds and fibres. As it turned out I used my hands a lot but the big spoon and the teaspoon did help to get the job done. |
 |
| Total time to complete the cleaning of the innards was about 20 minutes to half an hour. |
 |
| Wiping out with paper towels probably helps. |
 |
| Put the lid back on and brain surgery part 1 is complete, just like real brain surgery. |
 |
| I am especially thrilled with the lid, it actually fits! |
 |
| To carve the face, first Pammy used a biro to draw the eyes, nose and gap-toothed smile. |
 |
| Then it was back to the "might come in handy one day" saw to carefully cut out the shapes. After cutting we pushed each shape from the inside, so it popped out. |
 |
| The saw made this job very easy, but at the end there were still lots of stringy dags left over. |
 |
| It took as long to finally tidy up the dags as it took to carve the eyes, nose and smile. Pammy did a superb job, such neat work! |


Looks awesome! Those strings are interesting, and remind me of the spaghetti squash which I've seen pics of. Not long to go now. Don't forget the treats, otherwise there might be some tricks. :)
ReplyDeleteGreat job Jamie and Pam - that's a superb lantern & now I feel quite motivated to do one too. How long will it last? And I think I'd better put a link to it on GardenDrum!
ReplyDeleteLike you we travelled in NE USA during October & were delighted with the Halloween displays. My Boston host said that there were really 2 separate festivals going on - Harvest with its pumpkins, chrysanthemums and scarecrows, as well as Halloween. And many combinations of the two. We loved them both.
Hi Catherine
ReplyDeleteThe various You Tube vids which I watched generally said that it's OK to carve your pumpkins anywhere up to two weeks before Halloween, so anytime from now on is OK.
And thanks for the link-up at Garden Drum. Hope it proves useful to fellow pumpkin carving newbies!
And you're right about the two festivals at the same time in October in the US, and lots of houses had a bit of both on show. On Halloween night itself we were at Times Square in New York, and it turned into a giant fancy dress party: we saw Superman, Ninjas, guys in Lederhosen, as well as lots of ghouls, witches etc.